I was reading a book on sabaki, which mentions that 'a' below is considered crude, and 1 is a better move (I've modified the diagram slightly from the book). I saw this sort of thing in a shape book before, too. The basic idea is a leaning attack turned trade, but I can't find anything that really examines this exact move/idea beyond calling it good (the shape book was especially frustrating in this regard).
I'm all gung ho to try this in a game (if I can remember in the heat of the moment), and I'm wondering if this has a name (in this case it's a 3-4 mid-high pincer joseki, but the pattern can happen on the sides of the board, too), and if there's any gotchas or variations to understand. As no doubt my opponents will not play calmly in response (1 looks too thin to be good at first glance).
Posts: 1585 Location: Barcelona, Spain (GMT+1) Liked others: 577 Was liked: 298
Rank: KGS 5k
KGS: RBerenguel
Tygem: rberenguel
Wbaduk: JohnKeats
Kaya handle: RBerenguel
Online playing schedule: KGS on Saturday I use to be online, but I can be if needed from 20-23 GMT+1
I'm wondering, what do you think your rival would play in response to 1?
_________________ Geek of all trades, master of none: the motto for my blog mostlymaths.net
I was reading a book on sabaki, which mentions that 'a' below is considered crude, and 1 is a better move (I've modified the diagram slightly from the book). I saw this sort of thing in a shape book before, too. The basic idea is a leaning attack turned trade, but I can't find anything that really examines this exact move/idea beyond calling it good (the shape book was especially frustrating in this regard).
I'm all gung ho to try this in a game (if I can remember in the heat of the moment), and I'm wondering if this has a name (in this case it's a 3-4 mid-high pincer joseki, but the pattern can happen on the sides of the board, too), and if there's any gotchas or variations to understand. As no doubt my opponents will not play calmly in response (1 looks too thin to be good at first glance).
I don't think that has a special name, except, of course, for jump attachment. But White "a" has a name: Atari atari!.
_________________ The Adkins Principle: At some point, doesn't thinking have to go on? — Winona Adkins
The aggressive low SDK troll demon that lives in my head would try some of these (I don't think they really work, but it's a good starting point for conversation).
Or this, which I think isn't as easily dismissed as the others. As white I'd feel uncomfortable trying to decide how to respond (do I slide into the corner for base? Do I try to rescue the lone stone black didn't capture?)
@jts: No, the driving tesuji is something different (though I think it's part of why 1 is a good move, as it sets up some driving tesuji aji for white).
Specifically, I have the demo chapter for "Vital Points and Skillful Finesse for Sabaki" from the "Go Books" app on iPhone. Chapter 1 talks about this. It says the atari 'a' in my original diagram is crude and 1 "is a fundamental skillful finesse for sabaki". Which I'm sure is true, as I've seen something similar in the "Making good shape" book. But in both cases it's just presented as good and not really explored.
I'm just taking the Q10 stone off the board to answer specifically about the regular two space high pincer joseki, to make it clear why we don't play your 'a' *here* (who knows, it might generalise).
In this diagram, black 'x' looks crazy painful for white, right? But white at 'x' would push from behind/kill off the marked stone. Because of this move 'x' here, white does not have any time to use the marked stone.
If black still plays 2 (fine), white 3, it does look impractical for black to play 'b' now, right? So your given sequence gets played. But can't black still try something different with 4? - Yes. He can play 4 at 5, as noted; but it is not bad for white. Can't black also play a different 2 after this 1? Yes, but still ok for white.
...Hmm. Hope I helped.
Answer to your actual question:
IIRC jts is right and this is lumped in as driving tesuji by some people, including jts, myself, and James Davies, I think. (Even if proper play is for black to then prevent the drive happening).
Edit:
Heavily paraphrased Numsgil wrote:
It looks like there could be really hard variations
-Yes. This can degenerate into a family of super-perilous avalanche joseki.
I really don't think it's a matter of the driving tesuji. The reason the second is better than the first is that it seems to allow establishing a base for the group while maintaining the option to run out to the center. Whereas the first seems to be a choice between the two options.
_________________ http://tchan001.wordpress.com A blog on Asian go books, go sightings, and interesting tidbits Go is such a beautiful game.
Tapping Driving Tesuji into Sensei's gives our move as an illustration (I have never edited that sensei's page or even looked at it before), so if we wanted to name the move, it seems like at least some people will say driving tesuji, though clearly this is just a matter of semantics.
Edit: Idly clicking around on sensei's yields "Flying Off Orthogonally" as a name for that attachment, in a page that seems specifically about your book's treatment of it.
I do not know about "flying off orthogonally" , but the Driving Tesuji page on Sensei's is right about this joseki. Note that the jump attachment is not called a driving tesuji, but the follow-up in this variation.
Well, at least my explanation as to why 'a' is bad in that joseki there was textbook (Ishida's, Takao's will give you the same), you can trust that, if not my semantics
Is there a rule of thumb for what name to ultimately give a tesuji?
Perhaps best is
(Jump-) Attachment tesuji -- The jump-attachment is a tesuji here
Sensei's calls it
Double-threat-tesuji -- It's a tesuji because it threatens two-ish followups
Jts & I's
Driving-tesuji -- It's a tesuji because it threatens driving tesuji (as well as the double-threat of its jump-attachment's followup ....) albeit driving-tesuji-proper will not be played.
Just for reference -- viewtopic.php?f=37&t=3439&start=80 Compare (a) atari to atari in the above Malkovich 104, and see also Post #86 in that thread (which refers yet to Malkovich 103 and another atari there.) This kind of atari, (a), which forces the opponent's stone to extend outward and ahead of yours is (often?) not good ("crude"?). (Of course, there are exceptions. ) The other atari (b) was (naturally) brought up in this thread, even though it was one move later ( ).
Posts: 6727 Location: Cambridge, UK Liked others: 436 Was liked: 3720
Rank: UK 4 dan
KGS: Uberdude 4d
OGS: Uberdude 7d
Numsgil wrote:
Or this, which I think isn't as easily dismissed as the others. As white I'd feel uncomfortable trying to decide how to respond (do I slide into the corner for base? Do I try to rescue the lone stone black didn't capture?)
I think is a strong move for black, especially given the support at q10. To play honte at a seems to me like a classic example of the dangers of "following joseki" without thinking about the actual position on the board. Even without q10 in place this descent is a powerful move, thought it does have a tinge of overplay: it will result in violent fighting. If white answers by blocking at c that's a nice exchange for black (though I have seen it in pro games) The idea of blocking is white still has miai of saving the cutting stone, or pincering the 2 stones on the right; that's why q10 in place makes a huge difference as that miai disappears. Fighting spirit calls for white to save the cutting stone: b is a tesuji for doing so in good shape. But then black will probably get to push at c in sente at some point which is pleasing. Here's a game of mine where I tried the descent (without q10 already) due to an unfinished joseki in an adjacent corner. http://www.online-go.com/games/board.php?boardID=178771
P.S. as for what that technique is called, I've not heard a particular name but it does crop up a lot. It is an example of miai: the crude atari gives black an obvious good answer and then white is without a good move, the attachment creates 2 good moves for white, only 1 of which black can deal with.
Posts: 477 Liked others: 192 Was liked: 357
Rank: 5d
The stone you added at z makes the whole position unusual (and also makes me wonder why on earth the push and cut was played...) so I've removed it to hopefully provide some more useful general advice.
The aggressive low SDK troll demon that lives in my head would try some of these (I don't think they really work, but it's a good starting point for conversation).
Or this, which I think isn't as easily dismissed as the others. As white I'd feel uncomfortable trying to decide how to respond (do I slide into the corner for base? Do I try to rescue the lone stone black didn't capture?)
As for the name, I don't have one either. Lots of moves I just think of as 'tesuji building', haengma or 'making shape'. Is it important enough to have its own name (apart from jumping attachment)? It's a useful technique, but it's derivative of the driving tesuji.
I'll briefly go through the moves you were considering. This is just what I think...
[go]$$Wc In this position, white's faced with the common strategic question "do I move into the centre or do I make a base?". It's a sensible question to ask and 'a' and 'b' are both playable, depending on the answer. Developing into the centre is usually right, except when it just creates a target for attack - in those cases taking the option to make a base locally is more sensible.
$$ ------------------
$$ . . . . . . . . . . . |
$$ . . . . . . . . . . . |
$$ . . . . . . . X . . . |
$$ . . . . . . O X . . . |
$$ . . . . . 2 X O O . . |
$$ . . . . . . . . . . . |
$$ . . . . . . a 1 . . . |
$$ . . . . . . . X b . . |
$$ . . . . . . . . . . . |
$$ . . . . . . . . . . . |
$$ . . . . . . . . . . . |[/go]
[go]$$Wc I think Uberdude already answered most of your questions about this. White can think about moves like a-d. If 4 is going to be especially powerful, then possibly white should've chosen to play 3 at 4 ('b' in the diagram above). I have some Chinese books about Lee Changho's "new moves". In one chapter he talks about the different options (a-e) at length. I can try to find it if you want, but it's pretty soporific stuff and I've never studied it very seriously.
$$ ------------------
$$ . . . . . . . . . . . |
$$ . . . . . . a . . . . |
$$ . . . . . b . X . . . |
$$ . . . . . c O X . . . |
$$ . . . . . 2 X O O . . |
$$ . . . . . . . . . . . |
$$ . . . . . . 3 1 e . . |
$$ . . . . . . d X 4 . . |
$$ . . . . . . . . . . . |
$$ . . . . . . . . . . . |
$$ . . . . . . . . . . . |[/go]
[go]$$Bc Who's better? Note: 8 could be at 'a' if the ladder after black 'b' favours white.
$$ ------------------
$$ . . . . . . . . . . . |
$$ . . . . . . . . . . . |
$$ . . . . . . a X . . . |
$$ . . . . . 9 O X . . . |
$$ . . . . . 2 X O O . . |
$$ . . . . 7 5 3 b . . . |
$$ . . . . . 6 4 O . . . |
$$ . . . . . . 1 X 8 . . |
$$ . . . . . . . . 0 . . |
$$ . . . . . . . . . . . |
$$ . . . . . . . . . . . |[/go]
I'm pretty sure older joseki books say that 1 here is bad for black because of this driving tesuji. I seem to remember learning that at some point.
However, I was flicking through a newer book at Younggil's Go club and it said that this is now considered slightly better for black. Since Younggil was there, I asked him about it. He said that some pros think black is better now, but he doesn't agree... I guess that's Go for you .
From a shape perspective, black is bad because white drove straight through again, damaging the two stones. However, Younggil pointed out that if you view those stones as a sacrifice, both players have given up two stones, so it's fairly even from that perspective.
Personally, I think it's a lot more important to just know enough technique to manage your shape properly when black tries different things. It's often hard to say whether black or white are better and, as you can see, even pros don't agree on this one.
I'm a bit embarrassed to say that when I was a weaker player (maybe around 5k) I used to believe too much stuff that books told me and then I'd get kind of self-righteous when the other player did something that was 'bad'. I'd feel like I had this big advantage and I'd usually overplay or play slackly later. Thinking like this actually makes you weaker, in my opinion. It's a bit like a recent thread I saw here about something to do with the 3-3 invasion and people were getting upset.
My advice to others is don't worry about stuff like that. Just aim to manage the position without giving too much away and if you're satisfied, then that's the most important thing. You can think about it more when you review your game. There's lots of stuff in Go books that's dogmatic and some which is just wrong. The books are still very useful for helping you get stronger (even the dogmatic books helped me a lot), but keep an open mind.
Posts: 34 Liked others: 0 Was liked: 3
Rank: some SDK
Universal go server handle: kwhyte
Uberdude wrote:
Numsgil wrote:
Or this, which I think isn't as easily dismissed as the others. As white I'd feel uncomfortable trying to decide how to respond (do I slide into the corner for base? Do I try to rescue the lone stone black didn't capture?)
I think is a strong move for black, especially given the support at q10. To play honte at a seems to me like a classic example of the dangers of "following joseki" without thinking about the actual position on the board. Even without q10 in place this descent is a powerful move, thought it does have a tinge of overplay: it will result in violent fighting. If white answers by blocking at c that's a nice exchange for black (though I have seen it in pro games) The idea of blocking is white still has miai of saving the cutting stone, or pincering the 2 stones on the right; that's why q10 in place makes a huge difference as that miai disappears. Fighting spirit calls for white to save the cutting stone: b is a tesuji for doing so in good shape. But then black will probably get to push at c in sente at some point which is pleasing. Here's a game of mine where I tried the descent (without q10 already) due to an unfinished joseki in an adjacent corner. http://www.online-go.com/games/board.php?boardID=178771
P.S. as for what that technique is called, I've not heard a particular name but it does crop up a lot. It is an example of miai: the crude atari gives black an obvious good answer and then white is without a good move, the attachment creates 2 good moves for white, only 1 of which black can deal with.
After reading this I did a quick database search of this position (without q10). The move here is the second most common after the usually cited joseki play, and occurs pretty frequently. To my surprise, white only rarely responds by pulling the stone on the top. The clear majority of the responses were either a or b here:
[go]$$Wc
$$ ------------------
$$ . . . . . . . . . . . |
$$ . . . . . . . . . . . |
$$ . . . . . . . X . . . |
$$ . . . . . . O X . . . |
$$ . . . . . X X O O . . |
$$ . . . . . . . . c . . |
$$ . . . . . . O O b . . |
$$ . . . . . . a X X . . |
$$ . . . . . . d . . . . |
$$ . . . . . . . . . . . |[/go]
White a was more common, even though it allows black b - white c -black d with ugly shape as a follow-up. After that things get complicated and seem to depend on the details on the rest of the board (and the sample size in my game collection is getting too small to draw any serious conclusions) but it seems like both sides are likely to leave the top alone for awhile - it is not so much an immediate threat to pull it out but aji for later.
Some of that is likely almost circular - if the threat of pulling it out was huge black wouldn't have played this way. So one shouldn't jump to too many conclusions. Still, it surprised me that professionals seem quite willing to play the white side of this sequence, and that black doesn't choose it more often.
[go]$$Wc
$$ ------------------
$$ . . . . . . . . . . . |
$$ . . . . . . . . . . . |
$$ . . . . . . . X . . . |
$$ . . . . . . W X . . . |
$$ . . . . . X X O O . . |
$$ . . . . . . . . c . . |
$$ . . . . . . O O b . . |
$$ . . . . . . a X X . . |
$$ . . . . . . d . . . . |
$$ . . . . . . . . . . . |[/go]
The move at 'a' is mainly about making white a bit stronger in the centre, before starting a fight using the marked stone at the top. It makes miai of the right and the left so white doesn't need to be in a hurry.
Once white starts the fight at the top, it ups the ante. After that there's no way to play simple 'forcing' exchanges, there are only ways to offer a trade. So it's better to play the reinforcing moves first and not have to offer an unfavourable trade later. It's not that pros aren't interested in the top, it's just that they're very patient players.
The book was making the point that players that know the joseki will still just atari at 'a' instead of playing 4 because they don't really understand the tesuji.
I'm not sure why I didn't just present the two diagrams instead of trying to combine them
[go]$$Bc Similar but different
$$ . . . . . . . X . . . |
$$ . . . . . . . . . . . |
$$ . . . . . . W X X c . |
$$ . . . . . d X O O . . |
$$ . . . . . . b . . . . |
$$ . . . . . . . O 1 . . |
$$ . . . . . . 2 X a . . |
$$ . . . . . . . . . . . |
$$ . . . . . . . B . . . |
$$ . . . . . . . . . . . |[/go]
I think this situation is quite a bit different to the one above, but I understand the point the book is trying to make.
White has a shortage of liberties and black has supporting stones, so black can play your move at 1, since the marked stone defends against the cut at 'a'. Continuing at 2 looks like the best way to resist. If black plays atari on either side, white will double atari and make reasonable shape, but black could just connect at 'a' and white isn't very flexible. White will probably end up having to play 'b' (and later 'c') to put up any sort of fight. If the ladder works, white could try 'd' instead (aiming to connect all the stones).
There's less implicit threat behind white's marked stone in this situation and both ways ('b' or 'd') white still feels pretty heavy to me.
Were there any other stones in the book diagram that would make white's position more flexible?
No, it wasn't a whole board problem, just that bit. Most of the book is whole board problems, but this was basically the intro to the first chapter, so I think the point was just that tesujis aren't just for corner positions and leave it at that.
Users browsing this forum: No registered users and 1 guest
You cannot post new topics in this forum You cannot reply to topics in this forum You cannot edit your posts in this forum You cannot delete your posts in this forum You cannot post attachments in this forum


 has a special name, except, of course, for jump attachment. But White "a" has a name: Atari atari!.
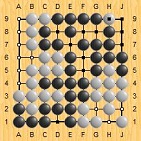
 -
-  is the driving tesuji.
 (a) atari to
  atari in the above Malkovich 104,
 there.)
 is a strong move for black, especially given the support at q10. To play honte at a seems to me like a classic example of the dangers of "following joseki" without thinking about the actual position on the board. Even without q10 in place this descent is a powerful move, thought it does have a tinge of overplay: it will result in violent fighting. If white answers