I'm trying to take this Malkovich game more seriously and write out detailed thoughts. I'm trying to incorporate a bunch of new ideas into my gameplay, and writing them out seems like a good way to sort them out and make useful applications to my game.
Ok, let's see what's going on here.
- Click Here To Show Diagram Code
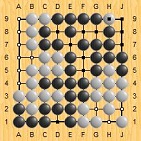
[go]$$Wcm14 Jump?
$$ ---------------------------------------
$$ | . . . . . . . . . . . . . . . . . . . |
$$ | . . . . . . . . . . . . . . . . . . . |
$$ | . . . . . . . . . . . . . . . . . . . |
$$ | . . . X . . . . . , . . . . . X . . . |
$$ | . . . . . . . . . . . . . . . . . . . |
$$ | . . . . . . . . . . . . . . . . . . . |
$$ | . . . . . . . . . . . . . . . . . . . |
$$ | . . . . . . . . . . . . . . . . . . . |
$$ | . . . . . . . . . . . . . . . . . . . |
$$ | . . . , . . . . . , . . . . . , . . . |
$$ | . . . . . . . . . . . . . . . . . . . |
$$ | . . . . . . . . . . . . . . . . . . . |
$$ | . . . . . . . . . . . . . . . . . . . |
$$ | . . . O . . . . . . . . . . . . . . . |
$$ | . . . . . . . . a . . . . . . . . . . |
$$ | . . O , . . O . . , . . . . . O . . . |
$$ | . . . O X X O . X . 1 . . . . . . . . |
$$ | . . . . . . X X . . . . . . . . . . . |
$$ | . . . . . . . . . . . . . . . . . . . |
$$ ---------------------------------------[/go]
For some reason, my first instinct is to make this one space jump at 'a', running into the center. As soon as I think about that, though, I can just see Bill Spight posting "Jowa says don't run" ...

I'm not even completely sure what that means, though I have a bit of an idea.

I'll come back to this when I discuss my options.
So, let's not immediately jump out. Instead, let's examine my options.
First, my group is already very solid. Any pressure

is putting on my group is minimal, I think. I have several options to settle the group right now into unassailable territory. I mentioned previously that each move made in a local area is of reduced potential for points due to the influence of the stones all around. This area of the board has become very crowded. The top and the right sides are both much more interesting. Tenuki may be a good option here.
What I need to do is make a plan. First I need to loosely decide how I expect the game to go, and choose a few moves that I definitely want to get. Let's look at the board:
- Click Here To Show Diagram Code
[go]$$Wcm14 First Cash Exchange
$$ ---------------------------------------
$$ | . . . . . . . . . . . . . . . . . . . |
$$ | . . . . . . . . . . . . . . . . . . . |
$$ | . . . . . . . . . . . . . . . . . . . |
$$ | . . . X . . . . . , . . . . . X . . . |
$$ | . . . . . . . . . . . . . . . . . . . |
$$ | . . . . . . . . . . . . . . . . . . . |
$$ | . . . . . . . . . . . . . . . . . . . |
$$ | . . . . . . . . . . . . . . . . . . . |
$$ | . . . . . . . . . . . . . . . . . . . |
$$ | . . . , . . . . . , . . . . . , . . . |
$$ | . . . . . . . . . . . . . . . . . . . |
$$ | . . . . . . . . . . . . . . . . . . . |
$$ | . . . . . . . . . . . . . . . . . . . |
$$ | S S . O . . . . . . . . . . . . . . . |
$$ | S S . . . . . . . . . . . . . . . . . |
$$ | S S O , . . O . . , . . . . . O . . . |
$$ | S S S O X X O . X . O . . . . . . . . |
$$ | S S S . . C X X . . . . . . . . . . . |
$$ | S S S . . C C C . . . . . . . . . . . |
$$ ---------------------------------------[/go]
We've had our first exchange in White's lower left corner. I call it White's corner, because White played in that local area first. It is natural for White to get more cash out of this corner, since White should never have fewer stones than Black if all plays are made locally. Now, with both groups mostly settled, the question becomes how each group can be used. White's corner looks like it should be able to naturally expand along the left side. Before
, Black's group on the bottom was set to be able to expand towards the bottom right. White made a choice to limit that expansion. I'd like to do the same to White's possible expansion on the left, so I would like to play somewhere around there eventually. I think C9 would be nice:
- Click Here To Show Diagram Code
[go]$$Bcm15 Black limits the left side
$$ ---------------------------------------
$$ | . . . . . . . . . . . . . . . . . . . |
$$ | . . . . . . . . . . . . . . . . . . . |
$$ | . . . . . . . . . . . . . . . . . . . |
$$ | . . . X . . . . . , . . . . . X . . . |
$$ | . . . . . . . . . . . . . . . . . . . |
$$ | . . a . . . . . . . . . . . . . . . . |
$$ | . . . . . . . . . . . . . . . . . . . |
$$ | . . b . . . . . . . . . . . . . . . . |
$$ | . . c . . . . . . . . . . . . . . . . |
$$ | . . . , . . . . . , . . . . . , . . . |
$$ | . . # . . . . . . . . . . . . . . . . |
$$ | . . . . . . . . . . . . . . . . . . . |
$$ | . . . . . . . . . . . . . . . . . . . |
$$ | . d . O . . . . . . . . . . . . . . . |
$$ | . . . . . . . . . . . . . . . . . . . |
$$ | . . O , . . O . . , . . . . . O . . . |
$$ | . . . O X X O . X . O . . . . . . . . |
$$ | . . . . . . X X . . . . . . . . . . . |
$$ | . . . . . . . . . . . . . . . . . . . |
$$ ---------------------------------------[/go]
I chose C9 (

) with the idea that it would be flexible. If White attacks my 4-4 with C14 ('a'), I can make an ideal extension to C12 ('b'), which is also a pincer. If White approaches C9 directly by playing at C11 ('c'), I can jump under to B6 ('d') to make a (cramped) base to jump out from.
The timing isn't right for C9 right now, though. The board is still very open, and White can build some great thickness towards the center or take a lot of profit in the upper left corner. I need to make sure what I gain from playing C9 balances what White gains from attacking C9. In order to time it right, though, I need to have sente at the right time.
We'll put C9 aside for now. The two biggest areas of the board are the top and right sides.
- Click Here To Show Diagram Code
[go]$$Bcm15 Big sides
$$ ---------------------------------------
$$ | . . . . . . . . . . . . . . . . . . . |
$$ | . . . . . . . . . . . . . . . . . . . |
$$ | . . . . . . . . . . . . . . . . . . . |
$$ | . . . X . . . . . , . . . . . X . . . |
$$ | . . . . . . . . . . . . . . . . . . . |
$$ | . . . . . . . . . . . . . . . . . . . |
$$ | . . . . . . . . . . . . . . . . . . . |
$$ | . . . . . . . . . . . . . . . . . . . |
$$ | . . . . . . . . . . . . . . . . . . . |
$$ | . . . , . . . . . , . . . . . , . . . |
$$ | . . . . . . . . . . . . . . . . . . . |
$$ | . . . . . . . . . . . . . . . . . . . |
$$ | . . . . . . . . . . . . . . . . . . . |
$$ | . . . O . . . . . . . . . . . . . . . |
$$ | . . . . . . . . . . . . . . . . . . . |
$$ | . . O , . . O . . , . . . . . O . . . |
$$ | . . . O X X O . X . O . . . . . . . . |
$$ | . . . . . . X X . . . . . . . . . . . |
$$ | . . . . . . . . . . . . . . . . . . . |
$$ ---------------------------------------
$$ {AR R10 R16}
$$ {AR R10 R4}
$$ {AR K17 Q17}
$$ {AR K17 D17}[/go]
K16 or K17 would be huge, but I'm not as concerned about getting this point. It doesn't look like this game will turn into a moyo game, so I want to look at countering whatever strategies my opponent has instead of simply taking big points wherever they are (I'll take it if my opponent gives it to me, though).
That leaves the right side. I'd like to approach his Q4 stone, and would likely do so at R6. Of course, with
at L3, the pincer is inevitable in that local area:
- Click Here To Show Diagram Code
[go]$$Bcm15 White is happy to pincer
$$ ---------------------------------------
$$ | . . . . . . . . . . . . . . . . . . . |
$$ | . . . . . . . . . . . . . . . . . . . |
$$ | . . . . . . . . . . . . . . . . . . . |
$$ | . . . X . . . . . , . . . . . X . . . |
$$ | . . . . . . . . . . . . . . . . . . . |
$$ | . . . . . . . . . . . . . . . . . . . |
$$ | . . . . . . . . . . . . . . . . . . . |
$$ | . . . . . . . . . . . . . . . . . . . |
$$ | . . . . . . . . . . . . . . . . . . . |
$$ | . . . , . . . . . , . . . . . , . . . |
$$ | . . . . . . . . . . . . . . . . . . . |
$$ | . . . . . . . . . . . . . . . . 2 . . |
$$ | . . . . . . . . . . . . . . 8 . . . . |
$$ | . . . O . . . . . . . . . . . . 1 7 . |
$$ | . . . . . . . . . . . . . . . 6 . . . |
$$ | . . O , . . O . . , . . . . . O 5 . . |
$$ | . . . O X X O . X . O . . . . 4 3 . . |
$$ | . . . . . . X X . . . . . . . . . . . |
$$ | . . . . . . . . . . . . . . . . . . . |
$$ ---------------------------------------[/go]
I do keep sente, so it's not a bad an exchange for me, but White gets a good wall facing an almost ideal extension. White gets to use his L3 stone well, and my Black group is looking more and more swallowed. Maybe I should step back and look again at Black's bottom group. There's a piece of wisdom that says you should try not to get sealed in. Right now, my group is not sealed in, and has potential towards the center in a couple places:
- Click Here To Show Diagram Code
[go]$$Bcm15 Prisoners: W=0, B=0
$$ ---------------------------------------
$$ | . . . . . . . . . . . . . . . . . . . |
$$ | . . . . . . . . . . . . . . . . . . . |
$$ | . . . . . . . . . . . . . . . . . . . |
$$ | . . . X . . . . . , . . . . . X . . . |
$$ | . . . . . . . . . . . . . . . . . . . |
$$ | . . . . . . . . . . . . . . . . . . . |
$$ | . . . . . . . . . . . . . . . . . . . |
$$ | . . . . . . . . . . . . . . . . . . . |
$$ | . . . . . . . . . . . . . . . . . . . |
$$ | . . . , . . . . . , . . . . . , . . . |
$$ | . . . . . . . . . . . . . . . . . . . |
$$ | . . . . . . . . . . . . . . . . . . . |
$$ | . . . . . . . . . . . . . . . . . . . |
$$ | . . . O . . . . . . . . . . . . . . . |
$$ | . . . . . . . . . . . . . . . . . . . |
$$ | . . O , . . @ . . , . . . . . O . . . |
$$ | . . . O X X @ . X . O . . . . . . . . |
$$ | . . . . . . X X . . . . . . . . . . . |
$$ | . . . . . . . . . . . . . . . . . . . |
$$ ---------------------------------------
$$ {AR F3 F6}
$$ {AR J3 J6}[/go]
The

stones are just sitting there right now, hanging off Black's group. It wouldn't take much to connect them to the left, though. I have to be careful not to lose access to the center from this group. I may want to play locally just to keep that access. Options?
- Click Here To Show Diagram Code
[go]$$Bcm15 Local options
$$ ---------------------------------------
$$ | . . . . . . . . . . . . . . . . . . . |
$$ | . . . . . . . . . . . . . . . . . . . |
$$ | . . . . . . . . . . . . . . . . . . . |
$$ | . . . X . . . . . , . . . . . X . . . |
$$ | . . . . . . . . . . . . . . . . . . . |
$$ | . . . . . . . . . . . . . . . . . . . |
$$ | . . . . . . . . . . . . . . . . . . . |
$$ | . . . . . . . . . . . . . . . . . . . |
$$ | . . . . . . . . . . . . . . . . . . . |
$$ | . . . , . . . . . , . . . . . , . . . |
$$ | . . . . . . . . . . . . . . . . . . . |
$$ | . . . . . . . . . . . . . . . . . . . |
$$ | . . . . . . . . . . . . . . . . . . . |
$$ | . . . O . . . . . . . . . . . . . . . |
$$ | . . . . . . . . a . . . . . . . . . . |
$$ | . . O , . . O . . , . . . . . O . . . |
$$ | . . . O X X O . X . O . c . . . . . . |
$$ | . . . . . . X X . . b . . . . . . . . |
$$ | . . . . . . . . . . . . . . . . . . . |
$$ ---------------------------------------[/go]
I think these three options ('a' to 'c') are reasonable to consider. First, the one space jump:
- Click Here To Show Diagram Code
[go]$$Bcm15 Break Sector Lines?
$$ ---------------------------------------
$$ | . . . . . . . . . . . . . . . . . . . |
$$ | . . . . . . . . . . . . . . . . . . . |
$$ | . . . . . . . . . . . . . . . . . . . |
$$ | . . . X . . . . . , . . . . . X . . . |
$$ | . . . . . . . . . . . . . . . . . . . |
$$ | . . . . . . . . . . . . . . . . . . . |
$$ | . . . . . . . . . . . . . . . . . . . |
$$ | . . . . . . . . . . . . . . . . . . . |
$$ | . . . . . . . . . . . . . . . . . . . |
$$ | . . . , . . . . . , . . . . . , . . . |
$$ | . . . . . . . . . . . . . . . . . . . |
$$ | . . . . . . . . . . . . . . . . . . . |
$$ | . . . . . . . . . . . . . . . . . . . |
$$ | . . . O . . . . . . . . . . . . . . . |
$$ | . . . . . . . . 1 . . . . . . . . . . |
$$ | . . O , . . O . . , . . . . . O . . . |
$$ | . . . O X X O . X . O . . . . . . . . |
$$ | . . . . . . X X . . . . . . . . . . . |
$$ | . . . . . . . . . . . . . . . . . . . |
$$ ---------------------------------------
$$ {LN D6 L3}[/go]
Way up top, I mentioned Bill's "Jowa says don't run" advice. If my bottom group was weak, this one space jump would definitely be considered running. My group isn't weak, though. In this case, I
THINK I'm breaking a sector line. I don't really know, because all the information I know about sector lines is what I've gleaned from reading posts on L19 and GD. So, perhaps I have the concept wrong. However, I do think that D6 and L3 form a sector line, and jumping like this breaks that sector line. It also keeps access to the center for my group, which is also important, and threatens to capture those two stones sitting on my wall. Eventually, capturing those stones will be worth quite a bit and White will either have to concede them to me, or will have to spend a move to save them. Either way, I can profit from it.
My only issue with this move is that it seems to give White exactly what he wants: I'm responding to his move so he keeps sente and dictates the flow of the game.
gives him some nice potential on the bottom right with Q4 in place. I want to make the game difficult on White, so I need to find a way to limit that potential.
Next option, settle with L2:
- Click Here To Show Diagram Code
[go]$$Bcm15 Settle
$$ ---------------------------------------
$$ | . . . . . . . . . . . . . . . . . . . |
$$ | . . . . . . . . . . . . . . . . . . . |
$$ | . . . . . . . . . . . . . . . . . . . |
$$ | . . . X . . . . . , . . . . . X . . . |
$$ | . . . . . . . . . . . . . . . . . . . |
$$ | . . . . . . . . . . . . . . . . . . . |
$$ | . . . . . . . . . . . . . . . . . . . |
$$ | . . . . . . . . . . . . . . . . . . . |
$$ | . . . . . . . . . . . . . . . . . . . |
$$ | . . . , . . . . . , . . . . . , . . . |
$$ | . . . . . . . . . . . . . . . . . . . |
$$ | . . . . . . . . . . . . . . . . . . . |
$$ | . . . . . . . . . . . . . . . . . . . |
$$ | . . . O . . . . . . . . . . . . . . . |
$$ | . . . . . . . . . . . . . . . . . . . |
$$ | . . O , . . O . . , . . . . . O . . . |
$$ | . . . O X X O . X . O a . . . . . . . |
$$ | . . . . . . X X . 3 1 2 . . . . . . . |
$$ | . . . . . . . . . . . . . . . . . . . |
$$ ---------------------------------------[/go]
This looks great to me. It's simple, feels natural, makes my group completely safe, and because of the cut at 'a' it should be sente (though I bet my opponent would at least consider tenuki from here). However, Black is still under threat of being sealed in on the bottom later on in the game.
Final local thought is to pincer White's stone:
- Click Here To Show Diagram Code
[go]$$Bcm15 Pincer ... White has numerous responses
$$ ---------------------------------------
$$ | . . . . . . . . . . . . . . . . . . . |
$$ | . . . . . . . . . . . . . . . . . . . |
$$ | . . . . . . . . . . . . . . . . . . . |
$$ | . . . X . . . . . , . . . . . X . . . |
$$ | . . . . . . . . . . . . . . . . . . . |
$$ | . . . . . . . . . . . . . . . . . . . |
$$ | . . . . . . . . . . . . . . . . . . . |
$$ | . . . . . . . . . . . . . . . . . . . |
$$ | . . . . . . . . . . . . . . . . . . . |
$$ | . . . , . . . . . , . . . . . , . . . |
$$ | . . . . . . . . . . . . . . . . . . . |
$$ | . . . . . . . . . . . . . . . . . . . |
$$ | . . . . . . . . . . . . . . . . . . . |
$$ | . . . O . . . . . . . . . . . . . . . |
$$ | . . . . . . . . . . a . . . . . . . . |
$$ | . . O , . . O . . c . b d . . O . . . |
$$ | . . . O X X O . X . O . 1 . . . . . . |
$$ | . . . . . . X X . . . . . . . . . . . |
$$ | . . . . . . . . . . . . . . . . . . . |
$$ ---------------------------------------[/go]
The pincer looks interesting. It reduces what White was trying to gain on the lower right. However, there are so many variations, and I can't be sure I'll come out with the sente that I want to have.
Too often I discard the natural feeling move for something complicated, like this pincer. I'm going to play the natural move to settle at L2. Possible continuation of the game:
- Click Here To Show Diagram Code
[go]$$Bcm15 Possible Continuation
$$ ---------------------------------------
$$ | . . . . . . . . . . . . . . . . . . . |
$$ | . . . . . . . . . . . . . . . . . . . |
$$ | . . . . . . . . . . . . . . . . . . . |
$$ | . . . X . . . . . , . . . . . X . . . |
$$ | . . . . . . . . . . . . . . . . . . . |
$$ | . . . . . . . . . . . . . . . . . . . |
$$ | . . . . . . . . . . . . . . . . . . . |
$$ | . . . . . . . . . . . . . . . . . . . |
$$ | . . . . . . . . . . . . . . . . . . . |
$$ | . . . , . . . . . , . . . . . , . . . |
$$ | . . . . . . . . . . . . . . . . . . . |
$$ | . . . . . . . . . . . . . . . . . . . |
$$ | . . . . . . . . . . . . . . . . . . . |
$$ | . . . O . . . . . . . . . . . . 5 . . |
$$ | . . . . . . . . . . . . . . . . . . . |
$$ | . . O , . . O . . , . . . . . O . . . |
$$ | . . . O X X O . X . O 4 . . . . . . . |
$$ | . . . . . . X X . 3 1 2 . . . . . . . |
$$ | . . . . . . . . . . . . . . . . . . . |
$$ ---------------------------------------[/go]
This is what feels natural. Of course, White may block in the other direction after the jump to R3 on this board:
- Click Here To Show Diagram Code
[go]$$Wcm1 New way to block
$$ ---------------------------------------
$$ | . . . . . . . . . . . . . . . . . . . |
$$ | . . . . . . . . . . . . . . . . . . . |
$$ | . . . . . . . . . . . . . . . . . . . |
$$ | . . . X . . . . . , . . . . . X . . . |
$$ | . . . . . . . . . . . . . . . . . . . |
$$ | . . . . . . . . . . . . . . . . a . . |
$$ | . . . . . . . . . . . . . . . . . . . |
$$ | . . . . . . . . . . . . . . . . . . . |
$$ | . . . . . . . . . . . . . . . . . . . |
$$ | . . . , . . . . . , . . . . . , . . . |
$$ | . . . . . . . . . . . . . . . . . . . |
$$ | . . . . . . . . . . . . . . . . 1 . . |
$$ | . . . . . . . . . . . . . . . . . . . |
$$ | . . . O . . . . . . . . . . . . # . . |
$$ | . . . . . . . . . . . . . . . . 9 5 . |
$$ | . . O , . . O . . , . . . . . O 3 4 7 |
$$ | . . . O X X O . X . O @ . . . . 2 8 . |
$$ | . . . . . . X X . # # @ . . 0 . . 6 . |
$$ | . . . . . . . . . . . . . . . . . . . |
$$ ---------------------------------------[/go]
I can't see this as bad for Black. Cash in the corner, a group of White stones at L3 to attack, and no weak groups for White to easily exploit. White can attack at 'a' and try to make the right side into profit. I'll have to think about a response if this is the board we reach.
Now, watch as my opponent plays tenuki immediately and throws all my thoughts out the window.


 ... will he jump in with
  ? The other possibility is:
 at 'a'!
 is the "kick", to which Black needs to respond. Black needs to strengthen
  , and so "stands up" with
  .
. and
and  make me strong.
  in this diagram looks like a terrible move. However, the response of
  is needlessly defensive.
 to keep them separated.
  sometime later to better use the aji of the G3 stone.
 in both corners. In the upper right (around
  ). Here,
  and
and  ... In this thought, Black gives up the corner in a pincer, then sets up a wall from which to approach at 'a'. This would suit me fine, but it's only one possibility. It is up to my opponent to decide how he'd like to play.