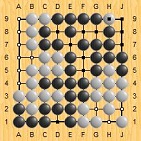
Go is funny in that you spend so much time in analysis, considering different positions, and then your opponent plays something unexpected!
I don't know joseki for the local position, but something in the back of my head is saying that this was popular with That Kitani pro guy. I don't know much about him, either, except that I think he was a rival to Go Seigen, he had glasses, I think, and he had a dojo, maybe. I wonder if "closed book" also means I can't look up info on a pro's history. I guess it can wait until this game is finished.
Anyway, my initial thought is that I can locally play O16 like I would if he played Q17.
My thoughts about this position:
Is this still the case now? Well, compared to my previous analysis, the actual game appears to have two effects on the overall aji of the two stones:
1.) O17 is weaker, since there is not as much space on the top, due to the just played P18 stone.
2.) P16 possibly has more potential, since I can consider moves like Q16, which didn't really make sense in the other joseki.
My gut feeling is that tenuki is still feasible here. that way, I can see what happens elsewhere, and then react. If he cuts or tries to break up the stones, there is possibly more useful aji than my analysis... So maybe the actual game is better for me, particularly if I opt to tenuki?
I don't want to commit to playing yet, but I am cleaning toward C10 for reasons described my my previous post.
I'm very unfamiliar with the top right shape, however, so I should be cautious and flexible to changing my mind.
I'll give this a bit more thought.
I don't know joseki for the local position, but something in the back of my head is saying that this was popular with That Kitani pro guy. I don't know much about him, either, except that I think he was a rival to Go Seigen, he had glasses, I think, and he had a dojo, maybe. I wonder if "closed book" also means I can't look up info on a pro's history. I guess it can wait until this game is finished.
Anyway, my initial thought is that I can locally play O16 like I would if he played Q17.
$$c Black: 0 White: 0
$$ ---------------------------------------
$$ | . . . . . . . . . . . . . . . . . . . |
$$ | . . . . . . . . . . . . . . O . . . . |
$$ | . . . . . . . . . . . . . X O . . . . |
$$ | . . . X . . . . . , . . . B X , O . . |
$$ | . . . . . . . . . . . . . . . . . . . |
$$ | . . . . . . . . . . . . . . . . . . . |
$$ | . . . . . . . . . . . . . . . . . . . |
$$ | . . . . . . . . . . . . . . . . . . . |
$$ | . . . . . . . . . . . . . . . . . . . |
$$ | . . . , . . . . . , . . . . . , . . . |
$$ | . . . . . . . . . . . . . . . . . . . |
$$ | . . . . . . . . . . . . . . . . . . . |
$$ | . . . . . . . . . . . . . . . . . . . |
$$ | . . . . . . . . . . . . . . . . . . . |
$$ | . . O . . . . . . . . . . . . . . . . |
$$ | . . . , . . . . . , . . . . . , . . . |
$$ | . . . . . . . . . . . . . . X . . . . |
$$ | . . . . . . . . . . . . . . . . . . . |
$$ | . . . . . . . . . . . . . . . . . . . |
$$ ---------------------------------------
$$ ---------------------------------------
$$ | . . . . . . . . . . . . . . . . . . . |
$$ | . . . . . . . . . . . . . . O . . . . |
$$ | . . . . . . . . . . . . . X O . . . . |
$$ | . . . X . . . . . , . . . B X , O . . |
$$ | . . . . . . . . . . . . . . . . . . . |
$$ | . . . . . . . . . . . . . . . . . . . |
$$ | . . . . . . . . . . . . . . . . . . . |
$$ | . . . . . . . . . . . . . . . . . . . |
$$ | . . . . . . . . . . . . . . . . . . . |
$$ | . . . , . . . . . , . . . . . , . . . |
$$ | . . . . . . . . . . . . . . . . . . . |
$$ | . . . . . . . . . . . . . . . . . . . |
$$ | . . . . . . . . . . . . . . . . . . . |
$$ | . . . . . . . . . . . . . . . . . . . |
$$ | . . O . . . . . . . . . . . . . . . . |
$$ | . . . , . . . . . , . . . . . , . . . |
$$ | . . . . . . . . . . . . . . X . . . . |
$$ | . . . . . . . . . . . . . . . . . . . |
$$ | . . . . . . . . . . . . . . . . . . . |
$$ ---------------------------------------
- Click Here To Show Diagram Code
[go]$$c Black: 0 White: 0

$$ ---------------------------------------

$$ | . . . . . . . . . . . . . . . . . . . |

$$ | . . . . . . . . . . . . . . O . . . . |

$$ | . . . . . . . . . . . . . X O . . . . |

$$ | . . . X . . . . . , . . . B X , O . . |

$$ | . . . . . . . . . . . . . . . . . . . |

$$ | . . . . . . . . . . . . . . . . . . . |

$$ | . . . . . . . . . . . . . . . . . . . |

$$ | . . . . . . . . . . . . . . . . . . . |

$$ | . . . . . . . . . . . . . . . . . . . |

$$ | . . . , . . . . . , . . . . . , . . . |

$$ | . . . . . . . . . . . . . . . . . . . |

$$ | . . . . . . . . . . . . . . . . . . . |

$$ | . . . . . . . . . . . . . . . . . . . |

$$ | . . . . . . . . . . . . . . . . . . . |

$$ | . . O . . . . . . . . . . . . . . . . |

$$ | . . . , . . . . . , . . . . . , . . . |

$$ | . . . . . . . . . . . . . . X . . . . |

$$ | . . . . . . . . . . . . . . . . . . . |

$$ | . . . . . . . . . . . . . . . . . . . |

$$ ---------------------------------------[/go]
$$c Black: 0 White: 0
$$ ---------------------------------------
$$ | . . . . . . . . . . . . . . . . . . . |
$$ | . . . . . . . . . . . . . . O . . . . |
$$ | . . . . . . . . . . . . . X O . . . . |
$$ | . . . X . . . . . , . . . . X B O . . |
$$ | . . . . . . . . . . . . . . . . . . . |
$$ | . . . . . . . . . . . . . . . . . . . |
$$ | . . . . . . . . . . . . . . . . . . . |
$$ | . . . . . . . . . . . . . . . . . . . |
$$ | . . . . . . . . . . . . . . . . . . . |
$$ | . . . , . . . . . , . . . . . , . . . |
$$ | . . . . . . . . . . . . . . . . . . . |
$$ | . . . . . . . . . . . . . . . . . . . |
$$ | . . . . . . . . . . . . . . . . . . . |
$$ | . . . . . . . . . . . . . . . . . . . |
$$ | . . O . . . . . . . . . . . . . . . . |
$$ | . . . , . . . . . , . . . . . , . . . |
$$ | . . . . . . . . . . . . . . X . . . . |
$$ | . . . . . . . . . . . . . . . . . . . |
$$ | . . . . . . . . . . . . . . . . . . . |
$$ ---------------------------------------
$$ ---------------------------------------
$$ | . . . . . . . . . . . . . . . . . . . |
$$ | . . . . . . . . . . . . . . O . . . . |
$$ | . . . . . . . . . . . . . X O . . . . |
$$ | . . . X . . . . . , . . . . X B O . . |
$$ | . . . . . . . . . . . . . . . . . . . |
$$ | . . . . . . . . . . . . . . . . . . . |
$$ | . . . . . . . . . . . . . . . . . . . |
$$ | . . . . . . . . . . . . . . . . . . . |
$$ | . . . . . . . . . . . . . . . . . . . |
$$ | . . . , . . . . . , . . . . . , . . . |
$$ | . . . . . . . . . . . . . . . . . . . |
$$ | . . . . . . . . . . . . . . . . . . . |
$$ | . . . . . . . . . . . . . . . . . . . |
$$ | . . . . . . . . . . . . . . . . . . . |
$$ | . . O . . . . . . . . . . . . . . . . |
$$ | . . . , . . . . . , . . . . . , . . . |
$$ | . . . . . . . . . . . . . . X . . . . |
$$ | . . . . . . . . . . . . . . . . . . . |
$$ | . . . . . . . . . . . . . . . . . . . |
$$ ---------------------------------------
- Click Here To Show Diagram Code
[go]$$c Black: 0 White: 0

$$ ---------------------------------------

$$ | . . . . . . . . . . . . . . . . . . . |

$$ | . . . . . . . . . . . . . . O . . . . |

$$ | . . . . . . . . . . . . . X O . . . . |

$$ | . . . X . . . . . , . . . . X B O . . |

$$ | . . . . . . . . . . . . . . . . . . . |

$$ | . . . . . . . . . . . . . . . . . . . |

$$ | . . . . . . . . . . . . . . . . . . . |

$$ | . . . . . . . . . . . . . . . . . . . |

$$ | . . . . . . . . . . . . . . . . . . . |

$$ | . . . , . . . . . , . . . . . , . . . |

$$ | . . . . . . . . . . . . . . . . . . . |

$$ | . . . . . . . . . . . . . . . . . . . |

$$ | . . . . . . . . . . . . . . . . . . . |

$$ | . . . . . . . . . . . . . . . . . . . |

$$ | . . O . . . . . . . . . . . . . . . . |

$$ | . . . , . . . . . , . . . . . , . . . |

$$ | . . . . . . . . . . . . . . X . . . . |

$$ | . . . . . . . . . . . . . . . . . . . |

$$ | . . . . . . . . . . . . . . . . . . . |

$$ ---------------------------------------[/go]
My thoughts about this position:
$$c Black: 0 White: 0
$$ ---------------------------------------
$$ | . . . . . . . . . . . . . . . . . . . |
$$ | . . . . . . . . . . . . . . . . . . . |
$$ | . . . . . . . . . . . . . B O O . . . |
$$ | . . . X . . . . . , . . . . B , O . . |
$$ | . . . . . . . . . . . . . . . . . . . |
$$ | . . . . . . . . . . . . . . . . . . . |
$$ | . . . . . . . . . . . . . . . . . . . |
$$ | . . . . . . . . . . . . . . . . . . . |
$$ | . . . . . . . . . . . . . . . . . . . |
$$ | . . . , . . . . . , . . . . . , . . . |
$$ | . . . . . . . . . . . . . . . . . . . |
$$ | . . . . . . . . . . . . . . . . . . . |
$$ | . . . . . . . . . . . . . . . . . . . |
$$ | . . . . . . . . . . . . . . . . . . . |
$$ | . . O . . . . . . . . . . . . . . . . |
$$ | . . . , . . . . . , . . . . . , . . . |
$$ | . . . . . . . . . . . . . . X . . . . |
$$ | . . . . . . . . . . . . . . . . . . . |
$$ | . . . . . . . . . . . . . . . . . . . |
$$ ---------------------------------------
$$ ---------------------------------------
$$ | . . . . . . . . . . . . . . . . . . . |
$$ | . . . . . . . . . . . . . . . . . . . |
$$ | . . . . . . . . . . . . . B O O . . . |
$$ | . . . X . . . . . , . . . . B , O . . |
$$ | . . . . . . . . . . . . . . . . . . . |
$$ | . . . . . . . . . . . . . . . . . . . |
$$ | . . . . . . . . . . . . . . . . . . . |
$$ | . . . . . . . . . . . . . . . . . . . |
$$ | . . . . . . . . . . . . . . . . . . . |
$$ | . . . , . . . . . , . . . . . , . . . |
$$ | . . . . . . . . . . . . . . . . . . . |
$$ | . . . . . . . . . . . . . . . . . . . |
$$ | . . . . . . . . . . . . . . . . . . . |
$$ | . . . . . . . . . . . . . . . . . . . |
$$ | . . O . . . . . . . . . . . . . . . . |
$$ | . . . , . . . . . , . . . . . , . . . |
$$ | . . . . . . . . . . . . . . X . . . . |
$$ | . . . . . . . . . . . . . . . . . . . |
$$ | . . . . . . . . . . . . . . . . . . . |
$$ ---------------------------------------
- Click Here To Show Diagram Code
[go]$$c Black: 0 White: 0

$$ ---------------------------------------

$$ | . . . . . . . . . . . . . . . . . . . |

$$ | . . . . . . . . . . . . . . . . . . . |

$$ | . . . . . . . . . . . . . B O O . . . |

$$ | . . . X . . . . . , . . . . B , O . . |

$$ | . . . . . . . . . . . . . . . . . . . |

$$ | . . . . . . . . . . . . . . . . . . . |

$$ | . . . . . . . . . . . . . . . . . . . |

$$ | . . . . . . . . . . . . . . . . . . . |

$$ | . . . . . . . . . . . . . . . . . . . |

$$ | . . . , . . . . . , . . . . . , . . . |

$$ | . . . . . . . . . . . . . . . . . . . |

$$ | . . . . . . . . . . . . . . . . . . . |

$$ | . . . . . . . . . . . . . . . . . . . |

$$ | . . . . . . . . . . . . . . . . . . . |

$$ | . . O . . . . . . . . . . . . . . . . |

$$ | . . . , . . . . . , . . . . . , . . . |

$$ | . . . . . . . . . . . . . . X . . . . |

$$ | . . . . . . . . . . . . . . . . . . . |

$$ | . . . . . . . . . . . . . . . . . . . |

$$ ---------------------------------------[/go]
Is this still the case now? Well, compared to my previous analysis, the actual game appears to have two effects on the overall aji of the two stones:
1.) O17 is weaker, since there is not as much space on the top, due to the just played P18 stone.
2.) P16 possibly has more potential, since I can consider moves like Q16, which didn't really make sense in the other joseki.
$$c Black: 0 White: 0
$$ ---------------------------------------
$$ | . . . . . . . . . . . . . . . . . . . |
$$ | . . . . . . . . . . . . . . O . . . . |
$$ | . . . . . . . . . . . . . B O . . . . |
$$ | . . . X . . . . . , . . . . B , O . . |
$$ | . . . . . . . . . . . . . . . . . . . |
$$ | . . . . . . . . . . . . . . . . . . . |
$$ | . . . . . . . . . . . . . . . . . . . |
$$ | . . . . . . . . . . . . . . . . . . . |
$$ | . . . . . . . . . . . . . . . . . . . |
$$ | . . X , . . . . . , . . . . . , . . . |
$$ | . . . . . . . . . . . . . . . . . . . |
$$ | . . . . . . . . . . . . . . . . . . . |
$$ | . . . . . . . . . . . . . . . . . . . |
$$ | . . . . . . . . . . . . . . . . . . . |
$$ | . . O . . . . . . . . . . . . . . . . |
$$ | . . . , . . . . . , . . . . . , . . . |
$$ | . . . . . . . . . . . . . . X . . . . |
$$ | . . . . . . . . . . . . . . . . . . . |
$$ | . . . . . . . . . . . . . . . . . . . |
$$ ---------------------------------------
$$ ---------------------------------------
$$ | . . . . . . . . . . . . . . . . . . . |
$$ | . . . . . . . . . . . . . . O . . . . |
$$ | . . . . . . . . . . . . . B O . . . . |
$$ | . . . X . . . . . , . . . . B , O . . |
$$ | . . . . . . . . . . . . . . . . . . . |
$$ | . . . . . . . . . . . . . . . . . . . |
$$ | . . . . . . . . . . . . . . . . . . . |
$$ | . . . . . . . . . . . . . . . . . . . |
$$ | . . . . . . . . . . . . . . . . . . . |
$$ | . . X , . . . . . , . . . . . , . . . |
$$ | . . . . . . . . . . . . . . . . . . . |
$$ | . . . . . . . . . . . . . . . . . . . |
$$ | . . . . . . . . . . . . . . . . . . . |
$$ | . . . . . . . . . . . . . . . . . . . |
$$ | . . O . . . . . . . . . . . . . . . . |
$$ | . . . , . . . . . , . . . . . , . . . |
$$ | . . . . . . . . . . . . . . X . . . . |
$$ | . . . . . . . . . . . . . . . . . . . |
$$ | . . . . . . . . . . . . . . . . . . . |
$$ ---------------------------------------
- Click Here To Show Diagram Code
[go]$$c Black: 0 White: 0

$$ ---------------------------------------

$$ | . . . . . . . . . . . . . . . . . . . |

$$ | . . . . . . . . . . . . . . O . . . . |

$$ | . . . . . . . . . . . . . B O . . . . |

$$ | . . . X . . . . . , . . . . B , O . . |

$$ | . . . . . . . . . . . . . . . . . . . |

$$ | . . . . . . . . . . . . . . . . . . . |

$$ | . . . . . . . . . . . . . . . . . . . |

$$ | . . . . . . . . . . . . . . . . . . . |

$$ | . . . . . . . . . . . . . . . . . . . |

$$ | . . X , . . . . . , . . . . . , . . . |

$$ | . . . . . . . . . . . . . . . . . . . |

$$ | . . . . . . . . . . . . . . . . . . . |

$$ | . . . . . . . . . . . . . . . . . . . |

$$ | . . . . . . . . . . . . . . . . . . . |

$$ | . . O . . . . . . . . . . . . . . . . |

$$ | . . . , . . . . . , . . . . . , . . . |

$$ | . . . . . . . . . . . . . . X . . . . |

$$ | . . . . . . . . . . . . . . . . . . . |

$$ | . . . . . . . . . . . . . . . . . . . |

$$ ---------------------------------------[/go]
My gut feeling is that tenuki is still feasible here. that way, I can see what happens elsewhere, and then react. If he cuts or tries to break up the stones, there is possibly more useful aji than my analysis... So maybe the actual game is better for me, particularly if I opt to tenuki?
I don't want to commit to playing yet, but I am cleaning toward C10 for reasons described my my previous post.
I'm very unfamiliar with the top right shape, however, so I should be cautious and flexible to changing my mind.
I'll give this a bit more thought.