Page 4 of 6
Re: LZ help for position
Posted: Mon Jan 21, 2019 10:17 pm
by jaca
Uberdude wrote: Even on a weak computer LZ is so strong it can teach a lot
to be sure, to be sure!

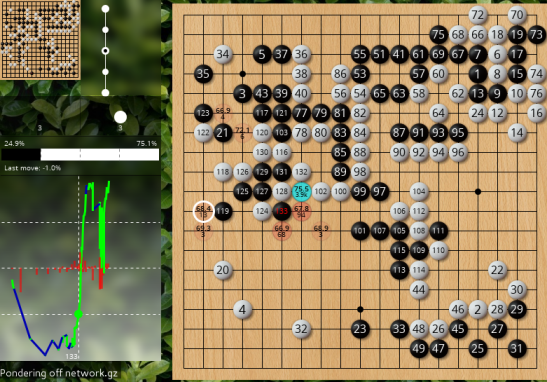
i've just received Lizzie's win% graph help in identifying where i managed to start losing a game in which i had been 92% ahead for most of the first 100 moves, when black invaded my moyo and succeeded in cutting off its head.
- courage.png (397.37 KiB) Viewed 13740 times
staring through Lizzie's window at Laizy's preferred stubborn connection for a while, it still wasn't apparent that my plan of letting black get away with a bit of cheek was all bad - she rated my intendedly sabaki duck around the side at 68% compared to relentless connection in the middle at 75%.
as a general principle, i am happy to let opp grab a few trinkets in return for a safe passage home - but i was curious to see how Laizy expected her preferred move to play out, as it looked like it would be a massive fight and i would be putting all my eggs in one basket.
this is what she showed me!
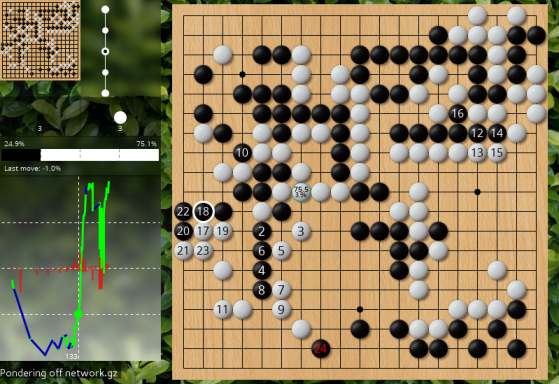
- fight.png (390.86 KiB) Viewed 13740 times
oh, gosh, surely that kind of "all-or-nothing" fight isn't even necessary for white to risk, as my simple-minded sacrifice tactic still left me with a huge advantage?
- but an advantage i was to squander with a series of blunders, possibly because of having been a bit demoralised at having let black get away with his desperate lunge so easily.
so what has Laizy taught me?
one thing for sure: i don't heed Lady MacBeth's stern enjoinder to screw my courage to the sticking point !!
Re: LZ help for position
Posted: Tue Jan 22, 2019 3:06 am
by Uberdude
jaca wrote:
as a general principle, i am happy to let opp grab a few trinkets in return for a safe passage home - but i was curious to see how Laizy expected her preferred move to play out, as it looked like it would be a massive fight and i would be putting all my eggs in one basket.
this is what she showed me!
fight.png
oh, gosh, surely that kind of "all-or-nothing" fight isn't even necessary for white to risk, as my simple-minded sacrifice tactic still left me with a huge advantage?
That doesn't look too "all-or nothing" to me as white connects home but lets black cut at 10 so isn't trying to kill the black group. But as a Lizzie usage tip, I suggest not paying too much attention to these long LZ #1 move suggested sequences (though they are sensible moves, unlike Leela 0.11 whose variations get silly after not much depth). Instead play out variations on the board, taking what looks like a plausible move for players at your level from LZ's suggested moves. This way you can see what could happen in your game if you played a bit better with moves within your ken and no blunders. Sometimes LZ's suggestions only work if you can then play super-strong sharp moves you'd never think of, but quite often there's also a simpler way that's suitable for you.
Re: LZ help for position
Posted: Tue Jan 22, 2019 5:17 am
by jaca
jaca wrote:that kind of "all-or-nothing" fight
my apologies for not properly explaining that when i was looking at what move to make in the actual game,
before looking at Laizy's post-game readout, it had looked to me
as if i would be risking an all-or-nothing-fight, so i elected to give way and duck around the side, hoping to only have to sacrifice a few stones in the middle.
And then when i saw what Laizy had to say about resolutely taking on the whole black thing, i was jolly glad i hadn't risked that treacherous sequence, which didn't resolve into anything clear to one as weak as me for 11 moves. And that was just one path through a surely very bushy highly tactical fight tree.
as it happens, it looks to me that Laizy also saw the blue connection in courage.png as an all-or-nothing play, in the sense that at the end of its 22-move long principal variation, white's advantage would be 73%, a 2:1 advantage with no weak groups left on the board, an overwhelming advantage in the hands of a skilled player such as herself.
the violent see-saws in the win% graph demonstrate to me that neither i nor my opp can read (see) what Laizy reads (sees), which reminds me of joseki - sequences that are like a tightrope - one slip off the beaten path and you fall into disgrace.
this was my first experience of Laizy - i kinda feel like she is a tough teacher.
Re: LZ help for position
Posted: Tue Jan 22, 2019 8:06 am
by Bill Spight
jaca wrote:And then when i saw what Laizy had to say about resolutely taking on the whole black thing, i was jolly glad i hadn't risked that treacherous sequence, which didn't resolve into anything clear to one as weak as me for 11 moves. And that was just one path through a surely very bushy highly tactical fight tree.
as it happens, it looks to me that Laizy also saw the blue connection in courage.png as an all-or-nothing play, in the sense that at the end of its 22-move long principal variation, white's advantage would be 73%, a 2:1 advantage with no weak groups left on the board, an overwhelming advantage in the hands of a skilled player such as herself.
Uberdude wrote: But as a Lizzie usage tip, I suggest not paying too much attention to these long LZ #1 move suggested sequences (though they are sensible moves, unlike Leela 0.11 whose variations get silly after not much depth). Instead play out variations on the board, taking what looks like a plausible move for players at your level from LZ's suggested moves. This way you can see what could happen in your game if you played a bit better with moves within your ken and no blunders.
(Emphasis mine.)
BTW, a 73% advantage with no weak groups is also a very strong advantage at your level.

With no weak groups of yours, how can your opponent catch up?
Another thing you can do with Lizzie is to find what it considers your three most costly mistakes in any game, and seek to understand them.
Re: LZ help for position
Posted: Tue Jan 22, 2019 2:08 pm
by jaca
Bill Spight wrote:a 73% advantage with no weak groups is also a very strong advantage at your level.
With no weak groups of yours, how can your opponent catch up?
you clearly have no idea just how low my level is!! because in the actual game, i still had a 68% advantage, but threw it all away, as the win%graph shows. and then my opp almost threw away the massive swing i had given to him, taking us back to close to 50%, before i blundered again and gave the game back to him for a second time, finally losing by 17 points when space ran out for us both to blunder more.
Bill Spight wrote:Another thing you can do with Lizzie is to find what it considers your three most costly mistakes in any game, and seek to understand them.
indeed so - that is precisely what i had set out to find, and honed in on the moves when my 95% and getting bigger advantage bottomed out and started to turn. it was just before the position shown, right after black invaded and i defended inaccurately. even then, though, the loss was not terminal, as i was still left with a 73% or 68% lead.
here is another example, where Laizy shows me the error of my ways that i can remember even if i didn't at first understand the full meaning of why her move is so good and my move was so bad that she didn't even consider it after pondering for what felt like half an hour:
i have to correct an earlier statement: it is not Laizy who is a tough teacher, but the game of Go itself.
btw, call me a pedantist, but it is not Featurecat's Lizzie who considers anything - it is gcp's Laizy who does all the considering - Lizzie is lovely, but she's only Laizy's window-dresser.
Re: LZ help for position
Posted: Tue Jan 22, 2019 2:22 pm
by Pippen
1) My question is after 5, White to play. How does LZ White see? What are the main choices? Leela suggest O17 but it seems too slow considering that the white split stone is pretty light and more or less a probe move. I was thinking like: why not invade in all three black corners with sente?
2) A purely tactical question: In move 167 my opponent played away from a big semeai race, probably thinking it was lost. But by my calculations if he would have taken a freedom away from my white group with 167 he'd have won the semeai. Is that true or did I oversee a possibility for me?
Re: LZ help for position
Posted: Tue Jan 22, 2019 2:56 pm
by Bill Spight
Pippen wrote:1) My question is after 5, White to play. How does LZ White see? What are the main choices? Leela suggest O17 but it seems too slow considering that the white split stone is pretty light and more or less a probe move. I was thinking like: why not invade in all three black corners with sente?
What makes you think you could invade all three black corners with sente?
Re: LZ help for position
Posted: Tue Jan 22, 2019 3:34 pm
by Pippen
Bill Spight wrote:What makes you think you could invade all three black corners with sente?
Personal game experience plus the fact that a 4-4 invasion has "natural" sente, i.e. if Black wants to gain sente he has to sacrifice momentum and compactness of his corner stones that White can take advantage of.
Re: LZ help for position
Posted: Tue Jan 22, 2019 4:20 pm
by Bill Spight
Pippen wrote:Bill Spight wrote:What makes you think you could invade all three black corners with sente?
Personal game experience
Good to know.
plus the fact that a 4-4 invasion has "natural" sente, i.e. if Black wants to gain sente he has to sacrifice momentum and compactness of his corner stones that White can take advantage of.
No, the 4-4 invasion does not have a natural sente. Yes, there is an obsolete joseki where the invasion has sente, but it's obsolete. Try to keep up. {teasing}
Re: LZ help for position
Posted: Tue Jan 22, 2019 4:48 pm
by jaca
Pippen wrote:My question is after 5, How does LZ White see? O17 seems too slow considering that the white split stone is more or less a probe move.
my question is: what does Pippen see?
to me, K17 is almost the exact opposite of a probe - its an "o-ba" (big place), albeit in this case one played perhaps too soon, as kakaris are bigger than obas. and it's not a split either, since neither of the black hoshi stones is weak.
But now that K17 is there, surely the only white moves worth considering now are kakaris against one of the black stones at the top, because a kakari would also support K17.
perhaps the one one the right is fractionally more vulnerable than the one on the left, because that has the other black stone in the bottom left as long-range indirect support, making it a touch more difficult for white to later make a position on the left side, especially if black responds to a kakari at the top by hopping down the left.
i'm super-weak, so maybe a stronger player can correct me, even if Laizy agrees with one of my two thoughts.
Re: LZ help for position
Posted: Tue Jan 29, 2019 4:47 pm
by Pippen
I am about to abandon my split-fuseki adventure since I feel I play too often from behind. Even if I play only one or two percentages worse fuseki it matters over many games. Here are a short collection of my usual fuseki approaches, first two me with black, last two me with white,
just look at the last stone played. Can u give me LZ's value of those last played stones and compare it to the best alternative moves and how LZ values them? If it's more than 2 points I might quit my extravagent fuseki-idea.
$$B
$$ +---------------------------------------+
$$ | . . . . . . . . . . . . . . . . . . . |
$$ | . . . . . . . . . . . . . . . . . . . |
$$ | . . . . . . . . . . . . . . . . . . . |
$$ | . . . 3 . . . . . , . . . . . 1 . . . |
$$ | . . . . . . . . . . . . . . . . . . . |
$$ | . . . . . . . . . . . . . . . . . . . |
$$ | . . . . . . . . . . . . . . . . . . . |
$$ | . . . . . . . . . . . . . . . . . . . |
$$ | . . . . . . . . . . . . . . . . . . . |
$$ | . . . , . . . . . , . . . . . , . . . |
$$ | . . . . . . . . . . . . . . . . . . . |
$$ | . . . . . . . . . . . . . . . . . . . |
$$ | . . . . . . . . . . . . . . . . . . . |
$$ | . . . . . . . . . . . . . . . . . . . |
$$ | . . . . . . . . . . . . . . . . . . . |
$$ | . . . 4 . . . . . , . . . . . 2 . . . |
$$ | . . . . . . . . . 5 . . . . . . . . . |
$$ | . . . . . . . . . . . . . . . . . . . |
$$ | . . . . . . . . . . . . . . . . . . . |
$$ +---------------------------------------+
- Click Here To Show Diagram Code
[go]$$B

$$ +---------------------------------------+

$$ | . . . . . . . . . . . . . . . . . . . |

$$ | . . . . . . . . . . . . . . . . . . . |

$$ | . . . . . . . . . . . . . . . . . . . |

$$ | . . . 3 . . . . . , . . . . . 1 . . . |

$$ | . . . . . . . . . . . . . . . . . . . |

$$ | . . . . . . . . . . . . . . . . . . . |

$$ | . . . . . . . . . . . . . . . . . . . |

$$ | . . . . . . . . . . . . . . . . . . . |

$$ | . . . . . . . . . . . . . . . . . . . |

$$ | . . . , . . . . . , . . . . . , . . . |

$$ | . . . . . . . . . . . . . . . . . . . |

$$ | . . . . . . . . . . . . . . . . . . . |

$$ | . . . . . . . . . . . . . . . . . . . |

$$ | . . . . . . . . . . . . . . . . . . . |

$$ | . . . . . . . . . . . . . . . . . . . |

$$ | . . . 4 . . . . . , . . . . . 2 . . . |

$$ | . . . . . . . . . 5 . . . . . . . . . |

$$ | . . . . . . . . . . . . . . . . . . . |

$$ | . . . . . . . . . . . . . . . . . . . |

$$ +---------------------------------------+[/go]
$$B
$$ +---------------------------------------+
$$ | . . . . . . . . . . . . . . . . . . . |
$$ | . . . . . . . . . . . . . . . . . . . |
$$ | . . . . . . . . . . . . . . . . . . . |
$$ | . . . 3 . . . . . , . . . . . 1 . . . |
$$ | . . . . . . . . . . . . . . . . . . . |
$$ | . . . . . . . . . . . . . . . . . . . |
$$ | . . . . . . . . . . . . . . . . . . . |
$$ | . . . . . . . . . . . . . . . . . . . |
$$ | . . . . . . . . . . . . . . . . . . . |
$$ | . . . , . . . . . , . . . . . , . . . |
$$ | . . . . . . . . . . . . . . . . . . . |
$$ | . . . . . . . . . . . . . . . . . . . |
$$ | . . . . . . . . . . . . . . . . . . . |
$$ | . . . . . . . . . . . . . . . . . . . |
$$ | . . . . . . . . . . . . . . . . . . . |
$$ | . . 4 , . . . . . , . . . . . 2 . . . |
$$ | . . . . . . . . . 5 . . . . . . . . . |
$$ | . . . . . . . . . . . . . . . . . . . |
$$ | . . . . . . . . . . . . . . . . . . . |
$$ +---------------------------------------+
- Click Here To Show Diagram Code
[go]$$B

$$ +---------------------------------------+

$$ | . . . . . . . . . . . . . . . . . . . |

$$ | . . . . . . . . . . . . . . . . . . . |

$$ | . . . . . . . . . . . . . . . . . . . |

$$ | . . . 3 . . . . . , . . . . . 1 . . . |

$$ | . . . . . . . . . . . . . . . . . . . |

$$ | . . . . . . . . . . . . . . . . . . . |

$$ | . . . . . . . . . . . . . . . . . . . |

$$ | . . . . . . . . . . . . . . . . . . . |

$$ | . . . . . . . . . . . . . . . . . . . |

$$ | . . . , . . . . . , . . . . . , . . . |

$$ | . . . . . . . . . . . . . . . . . . . |

$$ | . . . . . . . . . . . . . . . . . . . |

$$ | . . . . . . . . . . . . . . . . . . . |

$$ | . . . . . . . . . . . . . . . . . . . |

$$ | . . . . . . . . . . . . . . . . . . . |

$$ | . . 4 , . . . . . , . . . . . 2 . . . |

$$ | . . . . . . . . . 5 . . . . . . . . . |

$$ | . . . . . . . . . . . . . . . . . . . |

$$ | . . . . . . . . . . . . . . . . . . . |

$$ +---------------------------------------+[/go]
$$B
$$ +---------------------------------------+
$$ | . . . . . . . . . . . . . . . . . . . |
$$ | . . . . . . . . . . . . . . . . . . . |
$$ | . . . . . . . . . 4 . . . . . . . . . |
$$ | . . . 3 . . . . . , . . . . . 1 . . . |
$$ | . . . . . . . . . . . . . . . . . . . |
$$ | . . . . . . . . . . . . . . . . . . . |
$$ | . . . . . . . . . . . . . . . . . . . |
$$ | . . . . . . . . . . . . . . . . . . . |
$$ | . . . . . . . . . . . . . . . . . . . |
$$ | . . . , . . . . . , . . . . . , . . . |
$$ | . . . . . . . . . . . . . . . . . . . |
$$ | . . . . . . . . . . . . . . . . . . . |
$$ | . . . . . . . . . . . . . . . . . . . |
$$ | . . . . . . . . . . . . . . . . . . . |
$$ | . . . . . . . . . . . . . . . . . . . |
$$ | . . . , . . . . . , . . . . . 2 . . . |
$$ | . . . . . . . . . . . . . . . . . . . |
$$ | . . . . . . . . . . . . . . . . . . . |
$$ | . . . . . . . . . . . . . . . . . . . |
$$ +---------------------------------------+
- Click Here To Show Diagram Code
[go]$$B

$$ +---------------------------------------+

$$ | . . . . . . . . . . . . . . . . . . . |

$$ | . . . . . . . . . . . . . . . . . . . |

$$ | . . . . . . . . . 4 . . . . . . . . . |

$$ | . . . 3 . . . . . , . . . . . 1 . . . |

$$ | . . . . . . . . . . . . . . . . . . . |

$$ | . . . . . . . . . . . . . . . . . . . |

$$ | . . . . . . . . . . . . . . . . . . . |

$$ | . . . . . . . . . . . . . . . . . . . |

$$ | . . . . . . . . . . . . . . . . . . . |

$$ | . . . , . . . . . , . . . . . , . . . |

$$ | . . . . . . . . . . . . . . . . . . . |

$$ | . . . . . . . . . . . . . . . . . . . |

$$ | . . . . . . . . . . . . . . . . . . . |

$$ | . . . . . . . . . . . . . . . . . . . |

$$ | . . . . . . . . . . . . . . . . . . . |

$$ | . . . , . . . . . , . . . . . 2 . . . |

$$ | . . . . . . . . . . . . . . . . . . . |

$$ | . . . . . . . . . . . . . . . . . . . |

$$ | . . . . . . . . . . . . . . . . . . . |

$$ +---------------------------------------+[/go]
$$B
$$ +---------------------------------------+
$$ | . . . . . . . . . . . . . . . . . . . |
$$ | . . . . . . . . . . . . . . . . . . . |
$$ | . . . 3 . . . . . 4 . . . . . . . . . |
$$ | . . . , . . . . . , . . . . . 1 . . . |
$$ | . . . . . . . . . . . . . . . . . . . |
$$ | . . . . . . . . . . . . . . . . . . . |
$$ | . . . . . . . . . . . . . . . . . . . |
$$ | . . . . . . . . . . . . . . . . . . . |
$$ | . . . . . . . . . . . . . . . . . . . |
$$ | . . . , . . . . . , . . . . . , . . . |
$$ | . . . . . . . . . . . . . . . . . . . |
$$ | . . . . . . . . . . . . . . . . . . . |
$$ | . . . . . . . . . . . . . . . . . . . |
$$ | . . . . . . . . . . . . . . . . . . . |
$$ | . . . . . . . . . . . . . . . . . . . |
$$ | . . . , . . . . . , . . . . . 2 . . . |
$$ | . . . . . . . . . . . . . . . . . . . |
$$ | . . . . . . . . . . . . . . . . . . . |
$$ | . . . . . . . . . . . . . . . . . . . |
$$ +---------------------------------------+
- Click Here To Show Diagram Code
[go]$$B

$$ +---------------------------------------+

$$ | . . . . . . . . . . . . . . . . . . . |

$$ | . . . . . . . . . . . . . . . . . . . |

$$ | . . . 3 . . . . . 4 . . . . . . . . . |

$$ | . . . , . . . . . , . . . . . 1 . . . |

$$ | . . . . . . . . . . . . . . . . . . . |

$$ | . . . . . . . . . . . . . . . . . . . |

$$ | . . . . . . . . . . . . . . . . . . . |

$$ | . . . . . . . . . . . . . . . . . . . |

$$ | . . . . . . . . . . . . . . . . . . . |

$$ | . . . , . . . . . , . . . . . , . . . |

$$ | . . . . . . . . . . . . . . . . . . . |

$$ | . . . . . . . . . . . . . . . . . . . |

$$ | . . . . . . . . . . . . . . . . . . . |

$$ | . . . . . . . . . . . . . . . . . . . |

$$ | . . . . . . . . . . . . . . . . . . . |

$$ | . . . , . . . . . , . . . . . 2 . . . |

$$ | . . . . . . . . . . . . . . . . . . . |

$$ | . . . . . . . . . . . . . . . . . . . |

$$ | . . . . . . . . . . . . . . . . . . . |

$$ +---------------------------------------+[/go]
Re: LZ help for position
Posted: Tue Jan 29, 2019 5:04 pm
by Tryss
With LZ #197, at around 10k visits, it's roughly :
-4.5%
-5%
-7.5%
-7%
Alternatives moves are simple :
in the first two diagrams, approach white corner (or invade at 3-3), or shimari
In the last two diagrams, take the last corner instead
Re: LZ help for position
Posted: Tue Jan 29, 2019 5:24 pm
by Uberdude
Here is the opening gospel according to LZ, play the following moves if possible in order from top to bottom (he negative ones are for urgent local situations):
-3) if your 3-4 is being pressed, answer
-2) if your 4-4 is 3-3 invaded, answer it
-1) if your 4-4 is double approached, attach out
1) play in empty corner
2) approach (low) or enclose (big high) a 3-4
3) press if they ignored your approach to 3-4
4) approach or 3-3 invade a 4-4
5) double approach a 4-4
6) enclose from 4-4
You will notice side moves are nowhere to be seen. Corners before sides, as the old proverb says.
Re: LZ help for position
Posted: Thu Jan 31, 2019 8:03 pm
by Pippen
Tryss wrote:With LZ #197, at around 10k visits, it's roughly :
-4.5%
-5%
-7.5%
-7%
How big of an disadvantage is that? It seems pretty much for such an early stage since those openings were actually experimented with in the 30s of last century. Or maybe just 10K is too little? (no idea but with Leela 11 10.000 playouts would be very little).
Re: LZ help for position
Posted: Thu Jan 31, 2019 8:37 pm
by Bill Spight
Pippen wrote:Tryss wrote:With LZ #197, at around 10k visits, it's roughly :
-4.5%
-5%
-7.5%
-7%
How big of an disadvantage is that? It seems pretty much for such an early stage since those openings were actually experimented with in the 30s of last century. Or maybe just 10K is too little? (no idea but with Leela 11 10.000 playouts would be very little).
For the first one, the Black wedge of the nirensei, AlphaGo Teaching Tools say -5%. (Versus a 3-3 invasion.)