jann, yes that's a fair point: sometimes bots play the tighter move for less profit but better aji, because they evaluate the bad aji in those cases as being too much of a negative. If I could (facetiously) put words into Kageyama's mouth: he is saying "because 1 leaves bad aji and it is too difficult / I am too lazy to read out possibly downsides of that aji which may come far in the future of many different possibilities, and evaluate the pros and cons of that vs the aji/forcing moves left by the net which surely captures the cutting stones, I am not even going to think about it, and be proud in my ignorance (and because I'm a pro you should trust me)".
Bill, here's a screenshot of Lizzie with LZ #234 after ~100k playouts. You can see the distribution of playouts is very sharp: 100k at 48.8% for 'bad' 1, under 1k for every other move considered and just 9 for
a. So the error on its 42.3% (-6%) is large, playing that move and giving 100k playouts gets a winrate of 37.9% (-11%).
Attachment:
 Kageyama net or not.PNG [ 908.15 KiB | Viewed 15639 times ]
Here's my commentary/interpretation of LZ 234's opinion on some continuations, to help understand why it thinks net is bad.
Following Kageyama's net. LZ's instinct (low playouts) wants to peep from the outside, and this remains strong 1st choice at 100k playouts, though the expected continuation does change. The early idea was for 4 to be h17 (mine too), but then it changes to j16, a move closer to the top right corner and thus helping a bit more there. To start with it thought black should immediately answer 4 at h16 (36.9% with 30k) giving white the h17 atari, but after several 10ks playouts it decides that black is slightly better to resist and attack on the left side first with 5 (37.9% at 56k) because that's more sente. That white needs to take gote with 8-10 is indeed rather painful (the 'need' is not 100%, but pulling out the 3 stones for 8 is -10% and black gets e12 seal in sente so e14 get strong so cutting is less useful anyway).
- Click Here To Show Diagram Code
[go]$$Bc LZ punishing Kageyama's net
$$ +---------------------------------------+
$$ | . . . . . . . . . . . . . . . . . . . |
$$ | . . . . . . . . . . . . . . . . . . . |
$$ | . . X X X . 1 . . . . . . . . . O . . |
$$ | . . O X O O . . 4 , . . . . O , X . . |
$$ | . . O O X O 3 2 . . . . . . . . . . . |
$$ | . . O X X X X . . . . . . . . . . . . |
$$ | . . O X . . . . . . . . . . . . . . . |
$$ | . . . O . . . . . . . . . . . . . . . |
$$ | . 0 6 . . . . . . . . . . . . . . . . |
$$ | . 8 5 7 . . . . . , . . . . . , . . . |
$$ | . 9 . . . . . . . . . . . . . . . . . |
$$ | . . . . . . . . . . . . . . . . . . . |
$$ | . . . . . . . . . . . . . . . . . . . |
$$ | . . . . . . . . . . . . . . . . . . . |
$$ | . . . . . . . . . . . . . . . . . . . |
$$ | . . . X . . . . . , . . . . . , . . . |
$$ | . . . . . . . . . . . . . . . O . . . |
$$ | . . . . . . . . . . . . . . . . . . . |
$$ | . . . . . . . . . . . . . . . . . . . |
$$ +---------------------------------------+[/go]
Black's fix at h17 avoids giving white the atari there, and white then take the big opening move of a shimari (62.5% at 20k). Continuing in top right with q16 is not bad either (62.2 at 1.5k). Black continues there, white extends on the top and we can appreciate the h15 and j16 stones as useful moves bolstering this group, cover fire. They also served a purpose in that white was confident to play 12 as tenuki to shimari and not being scared of a black pincer at m16 instead of s17, as they provide some support in a fight that could follow.
- Click Here To Show Diagram Code
[go]$$Bcm11 LZ punishing Kageyama's net contd.
$$ +---------------------------------------+
$$ | . . . . . . . . . . . . . . . . . . . |
$$ | . . . . . . . . . . . . . . . . . . . |
$$ | . . X X X . X 1 . . 6 . . . . 4 O 3 . |
$$ | . . O X O O . . O , . . . . O , X . . |
$$ | . . O O X O X O . . . . . . . . . . . |
$$ | . . O X X X X . . . . . . . . . . . . |
$$ | . . O X . . . . . . . . . . . . 5 . . |
$$ | . . . O . . . . . . . . . . . . . . . |
$$ | . O O . . . . . . . . . . . . . . . . |
$$ | . O X X . . . . . , . . . . . , . . . |
$$ | . X . . . . . . . . . . . . . . . . . |
$$ | . . . . . . . . . . . . . . . . . . . |
$$ | . . . . . . . . . . . . . . . . . . . |
$$ | . . . . . . . . . . . . . . . . 2 . . |
$$ | . . . . . . . . . . . . . . . . . . . |
$$ | . . . X . . . . . , . . . . . , . . . |
$$ | . . . . . 7 . . . . . . . . . O . . . |
$$ | . . . . . . . . . . . . . . . . . . . |
$$ | . . . . . . . . . . . . . . . . . . . |
$$ +---------------------------------------+[/go]
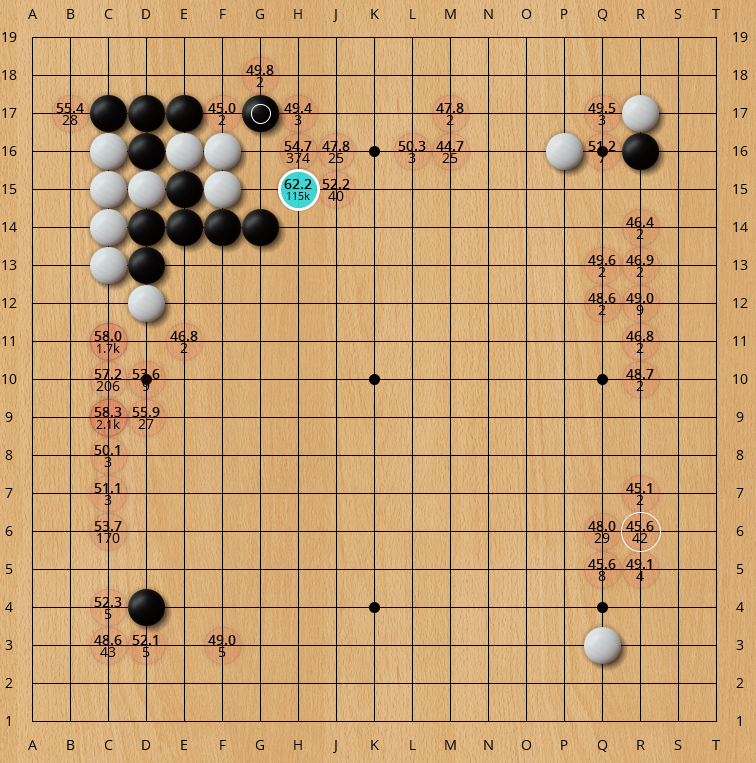
Given that LZ thought black could interpose the attack on the left with 5, I had a look what LZ thinks of black not immediately peeping the net but defending there. Here's LZ's view showing that it has a strong preference for immediate peep, but the extension and tiger mouth on the left there are the 2nd and 3rd choice moves, though a long way behind at 2k to 112k for the peep (and tiger mouth can amusingly revert with black d10, white h15).
Attachment:
 kage after net.PNG [ 933.55 KiB | Viewed 15639 times ]
So if extend (-3.4%), LZ wants to immediately clamp, taking advantage of the fact white extended further trying to be more efficient that tiger mouth to get a good exchange (white resist with e12 extend out is not unplayable, -3%) and then pincers on top. White now tries to get the same peep, but we get a clue why LZ wanted to peep immediately: with m16 in place already black can now reasonably resist with h14 instead of g15. Timing is so important in being able to make beneficial exchanges without the opponent reasonably resisting, and is probably behind bots tending to like exchanging early because, like here, they judge that they can't get it later. As black didn't defend, white attaches at 8 and then 10, and we have ourselves a complicated fight.
- Click Here To Show Diagram Code
[go]$$Bc What if extend on left?
$$ +---------------------------------------+
$$ | . . . . . . . . . . . . . . . . . . . |
$$ | . . . . . . . . . . . . . . . . . . . |
$$ | . . X X X . 1 0 . . . . . . . . O . . |
$$ | . . O X O O . . . , 8 5 . . O , X . . |
$$ | . . O O X O . 6 . . . 9 . . . . . . . |
$$ | . . O X X X X 7 . . . . . . . . . . . |
$$ | . . O X . . . . . . . . . . . . . . . |
$$ | . . 4 O . . . . . . . . . . . . . . . |
$$ | . . . 3 . . . . . . . . . . . . . . . |
$$ | . . . . . . . . . , . . . . . , . . . |
$$ | . . 2 . . . . . . . . . . . . . . . . |
$$ | . . . . . . . . . . . . . . . . . . . |
$$ | . . . . . . . . . . . . . . . . . . . |
$$ | . . . . . . . . . . . . . . . . . . . |
$$ | . . . . . . . . . . . . . . . . . . . |
$$ | . . . X . . . . . , . . . . . , . . . |
$$ | . . . . . . . . . . . . . . . O . . . |
$$ | . . . . . . . . . . . . . . . . . . . |
$$ | . . . . . . . . . . . . . . . . . . . |
$$ +---------------------------------------+[/go]
Further insight can be gained from asking what LZ would do if white simply tenukid to shimari after the net (-17%). Now black doesn't just attack with c12 checking extension, but b11 2nd line base attack! Such a move would have been overplay following white h15 peep, because in that case after black steals the base on the left white saves the 3 cutting stones so black f14 group is floating, so white left group being weak has a black weak group to pressure too in exchange.
- Click Here To Show Diagram Code
[go]$$Bc What if tenuki?
$$ +---------------------------------------+
$$ | . . . . . . . . . . . . . . . . . . . |
$$ | . . . . . . . . . . . . . . . . . . . |
$$ | . . X X X . 1 . . . . . . . . . O . . |
$$ | . . O X O O . . . , . . . . O , X . . |
$$ | . . O O X O . . . . . . . . . . . . . |
$$ | . . O X X X X . . . . . . . . . . . . |
$$ | . . O X . . . . . . . . . . . . . . . |
$$ | . 5 6 O . . . . . . . . . . . . . . . |
$$ | . 3 4 . . . . . . . . . . . . . . . . |
$$ | . . 7 8 . . . . . , . . . . . , . . . |
$$ | . . 9 0 . . . . . . . . . . . . . . . |
$$ | . . . . . . . . . . . . . . . . . . . |
$$ | . . a . . . . . . . . . . . . . . . . |
$$ | . . . . . . . . . . . . . . . . 2 . . |
$$ | . . . . . . . . . . . . . . . . . . . |
$$ | . . . X . . . . . , . . . . . , . . . |
$$ | . . . . . . . . . . . . . . . O . . . |
$$ | . . . . . . . . . . . . . . . . . . . |
$$ | . . . . . . . . . . . . . . . . . . . |
$$ +---------------------------------------+[/go]
So that's how LZ as white (and then black) would punish Kageyama's net. How about what happens with the bad aji with 'greedy' (or efficient) outside move? LZ does immediately want to turn. My first idea was for black to jump down to 2nd line h18, but LZ thinks j17 better (48.7% at 71k vs 44% at 60 for h18). So why is jump worse? Because even though it captures the white stones white gets a nice kikashi at j17. Actually 5 here is slack, black can play f18, white wedges at g18, black then connects and it's complicated, but for the sake of making a simple settled position to compare black ends this at 42%, compared to 38% for the net. White getting b17 in sente is some nice extra eyespace for that group and j17 peep is some use, but not as useful as the h15 and j16 forcing moves against the net. Plus remember this is black playing my bad move of h18 instead of LZ's favoured j17, though I imagine Kageyama might have glance-read this kind of line as an example of the 'bad aji not working yet' even if he professes to have not given it a second thought.
- Click Here To Show Diagram Code
[go]$$Bc Greedy then jump
$$ +---------------------------------------+
$$ | . . . . . . . . . . . . . . . . . . . |
$$ | . 7 . . . 9 . 3 . . . . . . . . . . . |
$$ | . 6 X X X 2 . 5 4 . . . . . . . O . . |
$$ | 8 . O X O O . 1 . , . . . . O , X . . |
$$ | . . O O X O . . . . . . . . . . . . . |
$$ | . . O X X X X . . . . . . . . . . . . |
$$ | . . O X . . . . . . . . . . . . . . . |
$$ | . . . O . . . . . . . . . . . . . . . |
$$ | . . . . . . . . . . . . . . . . . . . |
$$ | . . . , . . . . . , . . . . . , . . . |
$$ | . . . . . . . . . . . . . . . . . . . |
$$ | . . . . . . . . . . . . . . . . . . . |
$$ | . . . . . . . . . . . . . . . . . . . |
$$ | . . . . . . . . . . . . . . . . . . . |
$$ | . . . . . . . . . . . . . . . . . . . |
$$ | . . . X . . . . . , . . . . . , . . . |
$$ | . . . . . . . . . . . . . . . O . . . |
$$ | . . . . . . . . . . . . . . . . . . . |
$$ | . . . . . . . . . . . . . . . . . . . |
$$ +---------------------------------------+[/go]
So how is LZ's kosumi better than my jump? If white still dies then you got more points and stopped white getting j17 peep, so that would obviously be better. But white isn't dead now, but ko-ish. This is disquieting: a complicated sequence that is hard to judge and the kind of thing soba go tris to avoid, but bots relish.
- Click Here To Show Diagram Code
[go]$$Bc Greedy then kosumi?
$$ +---------------------------------------+
$$ | . . . . 9 0 . . . . . . . . . . . . . |
$$ | . . . 5 4 . 6 . . . . . . . . . . . . |
$$ | . . X X X 2 . . 3 . . . . . . . O . . |
$$ | . 7 O X O O . 1 . , . . . . O , X . . |
$$ | . . O O X O . . . . . . . . . . . . . |
$$ | . . O X X X X . . . . . . . . . . . . |
$$ | . . O X . . . . . . . . . . . . . . . |
$$ | . . . O . . . . . . . . . . . . . . . |
$$ | . . 8 . . . . . . . . . . . . . . . . |
$$ | . . . , . . . . . , . . . . . , . . . |
$$ | . . . . . . . . . . . . . . . . . . . |
$$ | . . . . . . . . . . . . . . . . . . . |
$$ | . . . . . . . . . . . . . . . . . . . |
$$ | . . . . . . . . . . . . . . . . . . . |
$$ | . . . . . . . . . . . . . . . . . . . |
$$ | . . . X . . . . . , . . . . . , . . . |
$$ | . . . . . . . . . . . . . . . O . . . |
$$ | . . . . . . . . . . . . . . . . . . . |
$$ | . . . . . . . . . . . . . . . . . . . |
$$ +---------------------------------------+[/go]
Here's how LZ sees the ko fight could continue. Ignoring 12 is -20%, it's almost a picnic ko for white. 13 extend instead of corner hane seems to be minimizing white's big threats because black can't afford to lose the ko, but hane is <1% worse in winrate and might revert anyway. Black concedes the ko with connect, so white gets some profit on left side and the top group isn't dead yet.
- Click Here To Show Diagram Code
[go]$$Bcm11 Don't play go if you are scared of ko (14 retakes)
$$ +---------------------------------------+
$$ | . . . 5 X O . . . . . . . . . . . . . |
$$ | . . . X O 1 O . . . . . . . . . . . . |
$$ | . 7 X X X O . . X . . . . . . . O . . |
$$ | . X O X O O . X . , . . . . O , X . . |
$$ | . 6 O O X O . . . . . . . . . . . . . |
$$ | . . O X X X X . . . . . . . . . . . . |
$$ | . . O X . . . . . . . . . . . . . . . |
$$ | . . . O . . . . . . . . . . . . . . . |
$$ | . . O . . . . . . . . . . . . . . . . |
$$ | . . . , . . . . . , . . . . . , . . . |
$$ | . . . . . . . . . . . . . . . . . . . |
$$ | . . . . . . . . . . . . . . . . . . . |
$$ | . . . . . . . . . . . . . . . . . . . |
$$ | . . 0 . . . . . . . . . . . . . . . . |
$$ | . . 8 3 . . . . . . . . . . . . . . . |
$$ | . . 2 X . . . . . , . . . . . , . . . |
$$ | . . 9 . . . . . . . . . . . . O . . . |
$$ | . . . . . . . . . . . . . . . . . . . |
$$ | . . . . . . . . . . . . . . . . . . . |
$$ +---------------------------------------+[/go]
The lower left resolves, and white j18 h17 to settle top group could be coming soon. Black is keeping the best win% he can get of 48-49% in these lines.
- Click Here To Show Diagram Code
[go]$$Bcm21 ko line cont.
$$ +---------------------------------------+
$$ | . . . X X O . . . . . . . . . . . . . |
$$ | . . . X O . O . . . . . . . . . . . . |
$$ | . X X X X O . . X . . 4 . . . . O . . |
$$ | . X O X O O . X . , . . . . O , X . . |
$$ | . O O O X O . . . . . . . . . . . . . |
$$ | . . O X X X X . . . . . . . . . . . . |
$$ | . . O X . . . . . . . . . . . . . . . |
$$ | . . . O . . . . . . . . . . . . . . . |
$$ | . . O . . . . . . . . . . . . . . . . |
$$ | . . 6 5 . . . . . , . . . . . , . . . |
$$ | . . . 7 . . . . . . . . . . . . . . . |
$$ | . . 8 . . . . . . . . . . . . . . . . |
$$ | . . 2 . . . . . . . . . . . . . . . . |
$$ | . . O 1 . . . . . . . . . . . . . . . |
$$ | . . O X . . . . . . . . . . . . 9 . . |
$$ | . . O X . . . . . , . . . . . , . . . |
$$ | . . X 3 . . . . . . . . . . . O . . . |
$$ | . . . . . . . . . . . . . . . . . . . |
$$ | . . . . . . . . . . . . . . . . . . . |
$$ +---------------------------------------+[/go]
Kageyama does say that white turn is disquieting
even if doesn't work yet, so he could be afraid of tenuki and the aji biting him in the arse later. It's hard to pick a particular sequence of play to illustrate this and test if that judgement was good, but in
the real game Kageyama defended on the left at c10 (which means black b16 isn't sente, so white f17 more pressure on corner in future) and then black continued in the upper right, allowing white to extend at m17. That f17 turn is definitely getting more disquieting now, so if black did play the greedy move he should play differently to handle it.
- Click Here To Show Diagram Code
[go]$$Bc Playing rest of board like real game
$$ +---------------------------------------+
$$ | . . . . . . . . . . . . . . . . . . . |
$$ | . . . . . . . . . . . . . . . . . . . |
$$ | . . X X X . . . . . . 8 . . . 4 O 3 . |
$$ | . . O X O O . 1 . , . . . . O , X . . |
$$ | . . O O X O . . . . . . . . . 7 . 5 . |
$$ | . . O X X X X . . . . . . . . . 6 . . |
$$ | . . O X . . . . . . . . . . . . . . . |
$$ | . . . O . . . . . . . . . . . . . . . |
$$ | . . . . . . . . . . . . . . . . . . . |
$$ | . . 2 , . . . . . , . . . . . , . . . |
$$ | . . . . . . . . . . . . . . . . . . . |
$$ | . . . . . . . . . . . . . . . . . . . |
$$ | . . . . . . . . . . . . . . . . . . . |
$$ | . . . . . . . . . . . . . . . . . . . |
$$ | . . . . . . . . . . . . . . . 9 . . . |
$$ | . . . X . . . . . , . . . . . , . . . |
$$ | . . . . . . . . . . . . . . . O . . . |
$$ | . . . . . . . . . . . . . . . . . . . |
$$ | . . . . . . . . . . . . . . . . . . . |
$$ +---------------------------------------+[/go]
So what's LZ's view on the above. 2 is -10%, should turn immediately as discussed above. 3 is then -13%, should be L17, allowing white s16. This obviously is concerned with nullifying the aji of f17 (black would now reply at f18). I could well imagine Kageyama and some other pros might not like the fact black spends 2 moves to fix the top here, instead of the 1 with the net. But the question is 1 move with net, and the useful forcing moves for white it leaves at h15 and j16, actually better than spending 2 moves on it for a position with more territory (l17 obviously big on its own and means after white s16 black can use it when activating r16) and leaving less useful kikashi for opponent. If black 3, white 4 obviously ok as urgent local shape. 5 is then a little bad (-3%), L17 or m17 again better. 6 should then be f17, and there's lots of choices for how black can continue. One interesting one is g18, then white e18 hane, f18 cut, b17 hane in corner and black d18: white sacrifices the 4 stones for b17 not getting blocked.
So the summary from LZ in this hypothetical future is: yes 1 on outside leaves bad aji, but net leaves too good forcing moves for opponent, so better to leave the aji, be mindful of it and potentially spend another move on it soon, than accept the slack result of net.


 has a winrate of 40.0% and an estimated score of -2.9.