which is a better move in this position?

For lessons, as well as threads about specific moves, and anything else worth studying.
nickxyzt
Beginner
Posts: 16
Joined: Mon Jan 03, 2011 1:48 am
Rank: 4 kyu
GD Posts: 30
Been thanked: 2 times

which is a better move in this position?

Post by nickxyzt »

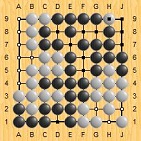
While trying to solve a problem, the following diagram arised (black to move):


Which is a better move for Black - A or B, and why?

(This kind of difference can be found in many other situations.)
p2501
Lives in gote
Posts: 598
Joined: Tue Jul 26, 2011 8:25 am
Rank: 4 kyu
GD Posts: 0
Universal go server handle: p2501
Location: Germany, Berlin
Has thanked: 331 times
Been thanked: 101 times

Re: which is a better move in this position?

Post by p2501 »

Just looking at it I'd say B is the only move.

edit: Forgot to tell why:
A) Gives white to much forcing moves. Don't like the shape.
B) More liberties. Puts severe pressure on the bottom left stones. Reserving which side to atari from seems good.
Last edited by p2501 on Fri Dec 14, 2012 6:39 am, edited 1 time in total.
Alguien
Lives in gote
Posts: 628
Joined: Tue Aug 07, 2012 11:50 pm
Rank: KGS 3k
GD Posts: 0
Universal go server handle: Alguien
Has thanked: 44 times
Been thanked: 93 times

Re: which is a better move in this position?

Post by Alguien »

My reasoning:
- the bottom b group has 3 libs.
- the one next to it has also 3 libs.
- whoever starts removing libs wins, if he can keep removing them.
- can I pull off putting a stone on the point under B, to remove a lib from W?
- I read it as a yes:
- option 1: w ataris my stone, I extend to 'B', he extends to not die, I capture bottom.
- option 2: w extends bottom, I play 'A' and capture w on a net (or he tries to escape net and I kill the now three stone bottom group).

(paint your problem as a usual (go) diagram and I'll paint my moves on it, if you want)
[edit: ok, ok ,I'll paint it:]
Click Here To Show Diagram Code
[go]$$B
$$ | . . . . . . . . . . . . . . . . . . . |
$$ | . . . . . . . . . . . . . 4 . . . . . |
$$ | . . . . . . . . . . . . 3 O X X X X . |
$$ | . . . . . . . . . . . 2 X O X O O O . |
$$ | . . . . . . . . . . . 1 O X O O . O . |
$$ | . . . . . . . . . . . 5 O X X . O . . |
$$ | . . . . . . . . . . . . . . . . . . . |
$$ ---------------------------------------[/go]
Click Here To Show Diagram Code
[go]$$B
$$ | . . . . . . . . . . . . . . . . . . . |
$$ | . . . . . . . . . . . . 6 3 . . . . . |
$$ | . . . . . . . . . . . . 4 O X X X X . |
$$ | . . . . . . . . . . . 5 X O X O O O . |
$$ | . . . . . . . . . . . 1 O X O O . O . |
$$ | . . . . . . . . . . 7 2 O X X . O . . |
$$ | . . . . . . . . . . . . . . . . . . . |
$$ ---------------------------------------[/go]
Click Here To Show Diagram Code
[go]$$B
$$ | . . . . . . . . . . . . . . . . . . . |
$$ | . . . . . . . . . . . . . 3 . . . . . |
$$ | . . . . . . . . . . . 6 4 O X X X X . |
$$ | . . . . . . . . . . 9 5 X O X O O O . |
$$ | . . . . . . . . . . 8 1 O X O O . O . |
$$ | . . . . . . . . . . 7 2 O X X . O . . |
$$ | . . . . . . . . . . . . . . . . . . . |
$$ ---------------------------------------[/go]
User avatar
SoDesuNe
Gosei
Posts: 1810
Joined: Wed Apr 21, 2010 1:57 am
Rank: KGS 1-dan
GD Posts: 0
Has thanked: 490 times
Been thanked: 365 times

Re: which is a better move in this position?

Post by SoDesuNe »

It's B in this situation.
Click Here To Show Diagram Code
[go]$$Bc White is forced to capture. Very good shape for Black, too.
$$ . . . . . . . . . . . . . . |
$$ . . . . , . . . . . , . . . |
$$ . . . . X . . . . . . . . . |
$$ . . . . . . . . . . . X . . |
$$ . . . . . . . . . . . . . . |
$$ . . . . . . . . . . . . . . |
$$ . . . . . . . . O X X X X . |
$$ . . . . , . 1 X O X O O O . |
$$ . 7 . . . . 5 O X O O . O . |
$$ . . . . . . 3 O X X 2 O . . |
$$ . . . . . . . . 6 4 . . . . |
$$ ----------------------------[/go]
Click Here To Show Diagram Code
[go]$$Bc If White resists, he just gets a weak group. B is save.
$$ . . . . . . . . . . . . . . |
$$ . . . . , . . . . . , . . . |
$$ . . . . X . . . . . . . . . |
$$ . . . . . . . . . . . B . . |
$$ . . . . . . . . . . . . . . |
$$ . . . . . . . . 2 . . . . . |
$$ . . . . . . . . O X X X X . |
$$ . . . . , . 1 X O X O O O . |
$$ . . . . . . . O X O O . O . |
$$ . . . . . . 3 O X X . O . . |
$$ . . . . . . . . . . . . . . |
$$ ----------------------------[/go]
Alguien:
Click Here To Show Diagram Code
[go]$$Bc
$$ . . . . . . . . . . . . |
$$ . . . . . . 3 . . . . . |
$$ . . . . . . O X X X X . |
$$ . . , . 4 X O X O O O . |
$$ . . . . 1 O X O O . O . |
$$ . . . . 2 O X X . O . . |
$$ . . . . . . . . . . . . |
$$ ------------------------[/go]
White plays :w4: here and has a really good result.


post scriptum:
I should get some rest... Forget what I edited :X
peppernut
Dies in gote
Posts: 63
Joined: Tue Oct 09, 2012 4:51 am
Rank: 5k
GD Posts: 0
KGS: peppernut
Has thanked: 12 times
Been thanked: 21 times

Re: which is a better move in this position?

Post by peppernut »

Click Here To Show Diagram Code
[go]$$Bc If White resists, he just gets a weak group. B is save.
$$ . . . . . . . . . . . . . . |
$$ . . . . , . . . . . , . . . |
$$ . . . . X . . . . . . . . . |
$$ . . . . . . . . . . . B . . |
$$ . . . . . . . . . . . . . . |
$$ . . . . . . . . a . . . . . |
$$ . . . . . . . . Q X X X X . |
$$ . . . . , . X X Q X O O O . |
$$ . . . . . . . @ X O O . O . |
$$ . . . . . . b @ X X . O . . |
$$ . . . . . . . . . . . . . . |
$$ ----------------------------[/go]
White has two groups of cutting stones. Looks to me like move B makes miai out of a and b, and one of the groups is going to die.

Move A drives the triangle group over your own cutting stone, and forces its capture, but Black gets guaranteed influence. If playing B and capturing the low group is unsatisfying, then okay, play A. But that's basically 5th line territory that you're giving up. Not seeing the rest of the board, I think it's clearly better to fight to kill one of the two white groups.
User avatar
topazg
Tengen
Posts: 4511
Joined: Wed Apr 21, 2010 3:08 am
Rank: Nebulous
GD Posts: 918
KGS: topazg
Location: Chatteris, UK
Has thanked: 1579 times
Been thanked: 650 times
Contact:

Re: which is a better move in this position?

Post by topazg »

Click Here To Show Diagram Code
[go]$$Bc White is forced to capture. Very good shape for Black, too.
$$ . . . . . . . . . . . . . . |
$$ . . . . , . . . . . , . . . |
$$ . . . . X . . . . . . . . . |
$$ . . . . . . . . . . . X . . |
$$ . . . . . . . . . . . . . . |
$$ . . . . . . . . 3 . . . . . |
$$ . . . . . . . . O X X X X . |
$$ . . . . , . 1 X O X O O O . |
$$ . . . . . . . O X O O . O . |
$$ . . . . . . . O X X 2 O . . |
$$ . . . . . . . . . . . . . . |
$$ ----------------------------[/go]
White has no such capture ... the extension at :b1: seems best to me.
Uberdude
Judan
Posts: 6727
Joined: Thu Nov 24, 2011 11:35 am
Rank: UK 4 dan
GD Posts: 0
KGS: Uberdude 4d
OGS: Uberdude 7d
Location: Cambridge, UK
Has thanked: 436 times
Been thanked: 3718 times

Re: which is a better move in this position?

Post by Uberdude »

I don't know the answer to that problem, though probably A is best as they both work and A asks white to make a heavy group in bad shape before capturing the side stones, whereas if white gets to nobi there his shape is better and the black group to the right could be attacked.

Also in that sort of shape sometimes the m2 clamp is the only move fast enough.

P.S. In topazg's diagram although black captures the outside stones which is great white does have a 1st line connection for later which he doesn't with the atari. If black is trying to make territory to the left side that could be quite significant.
User avatar
Loons
Gosei
Posts: 1378
Joined: Tue Apr 20, 2010 4:17 am
GD Posts: 0
Location: wHam!lton, Aotearoa
Has thanked: 253 times
Been thanked: 105 times

Re: which is a better move in this position?

Post by Loons »

My feeling was that 'a' is right, but now I'm not sure.
'a' gets closer to capturing the laddered stone.
Click Here To Show Diagram Code
[go]$$Wc
$$ . , . . . . . , . . . |
$$ . X . . . . . . . . . |
$$ . . . . . . . . X . . |
$$ . . . . . . . . . . . |
$$ . . . . . B . . . . . |
$$ . . . . 2 O X X X X . |
$$ . , . . X O X O O O . |
$$ . . 1 . O X O O . O . |
$$ . . . . O X X . O . . |
$$ . . . . . . . . . . . |
$$ ----------------------+[/go]
But how does eg. this aji (pulling them out as a reduction I guess):
Click Here To Show Diagram Code
[go]$$Wc
$$ . , . . . . . , . . . |
$$ . X . . . . . . . . . |
$$ . . . . . . . . X . . |
$$ . . . . . . . . . . . |
$$ . . . . . B . . . . . |
$$ . . . 3 1 O X X X X . |
$$ . , . 2 X O X O O O . |
$$ . . . . O X O O . O . |
$$ . . . . O X X . O . . |
$$ . . . . . . . . . . . |
$$ ----------------------+[/go]
Compare to:
Click Here To Show Diagram Code
[go]$$Wc
$$ . , . . . . . , . . . |
$$ . X . . . . . . . . . |
$$ . . . . . . . . X . . |
$$ . . . . . . . . . . . |
$$ . . . . . 1 . . . . . |
$$ . . . . . O X X X X . |
$$ . , . B X O X O O O . |
$$ . . . . O X O O . O . |
$$ . . . 2 O X X . O . . |
$$ . . . . . . . . . . . |
$$ ----------------------+[/go]
I think I overthought this.

Also this:
Click Here To Show Diagram Code
[go]$$Bc
$$ . , . . . . . , . . . |
$$ . X . . . . . . . . . |
$$ . . . . . . . . X . . |
$$ . . . . . . . . . . . |
$$ . . . . . X . . . . . |
$$ . . . . X . X X X X . |
$$ . , . X X . X O O O . |
$$ . . . . O X O O . O . |
$$ . . . . O X X O O . . |
$$ . . . . . O O . . . . |
$$ ----------------------+[/go]
Click Here To Show Diagram Code
[go]$$Bc
$$ . , . . . . . , . . . |
$$ . X . . . . . . . . . |
$$ . . . . . . . . X . . |
$$ . . . . . . . . . . . |
$$ . . . . X X . . . . . |
$$ . . . X . . X X X X . |
$$ . , . X X . X O O O . |
$$ . . . . O X O O . O . |
$$ . . . . O X X O O . . |
$$ . . . . . O O . . . . |
$$ ----------------------+[/go]
Revisiting Go - Study Journal
My Programming Blog - About the evolution of my go bot.
speedchase
Lives in sente
Posts: 800
Joined: Sun Dec 04, 2011 4:36 pm
Rank: AGA 2kyu
GD Posts: 0
Universal go server handle: speedchase
Has thanked: 139 times
Been thanked: 122 times

Re: which is a better move in this position?

Post by speedchase »

SoDesuNe wrote:It's B in this situation.
Click Here To Show Diagram Code
[go]$$Bc White is forced to capture. Very good shape for Black, too.
$$ . . . . . . . . . . . . . . |
$$ . . . . , . . . . . , . . . |
$$ . . . . X . . . . . . . . . |
$$ . . . . . . . . . . . X . . |
$$ . . . . . . . . . . . . . . |
$$ . . . . . . . . . . . . . . |
$$ . . . . . . . . O X X X X . |
$$ . . . . , . 1 X O X O O O . |
$$ . 7 . . . . 5 O X O O . O . |
$$ . . . . . . 3 O X X 2 O . . |
$$ . . . . . . . . 6 4 . . . . |
$$ ----------------------------[/go]
this is Terrible for black!
Click Here To Show Diagram Code
[go]$$Bc
$$ . . . . . . . . . . . . . . |
$$ . . . . , . . . . . , . . . |
$$ . . . . X . . . . . . . . . |
$$ . . . . . . . . . . . X . . |
$$ . . . . . . . . . . . . . . |
$$ . . . . . . . . 1 . . . . . |
$$ . . . . . . . . O X X X X . |
$$ . . . . , . X X O X O O O . |
$$ . . . . . . . O X O O . O . |
$$ . . . . . . . O X X 2 O . . |
$$ . . . . . . . . . . . . . . |
$$ ----------------------------[/go]
Ladder is the correct move
tj86430
Gosei
Posts: 1348
Joined: Wed Apr 28, 2010 12:42 am
Rank: FGA 7k GoR 1297
GD Posts: 0
Location: Finland
Has thanked: 49 times
Been thanked: 129 times

Re: which is a better move in this position?

Post by tj86430 »

speedchase wrote:
Click Here To Show Diagram Code
[go]$$Bc
$$ . . . . . . . . . . . . . . |
$$ . . . . , . . . . . , . . . |
$$ . . . . X . . . . . . . . . |
$$ . . . . . . . . . . . X . . |
$$ . . . . . . . . . . . . . . |
$$ . . . . . . . . 1 . . . . . |
$$ . . . . . . . . O X X X X . |
$$ . . . . , . X X O X O O O . |
$$ . . . . . . . O X O O . O . |
$$ . . . . . . . O X X 2 O . . |
$$ . . . . . . . . . . . . . . |
$$ ----------------------------[/go]
Ladder is the correct move
There is an extra black stone in your diagram.
Offending ad removed
User avatar
SoDesuNe
Gosei
Posts: 1810
Joined: Wed Apr 21, 2010 1:57 am
Rank: KGS 1-dan
GD Posts: 0
Has thanked: 490 times
Been thanked: 365 times

Re: which is a better move in this position?

Post by SoDesuNe »

speedchase wrote:
SoDesuNe wrote:It's B in this situation.
Click Here To Show Diagram Code
[go]$$Bc White is forced to capture. Very good shape for Black, too.
$$ . . . . . . . . . . . . . . |
$$ . . . . , . . . . . , . . . |
$$ . . . . X . . . . . . . . . |
$$ . . . . . . . . . . . X . . |
$$ . . . . . . . . . . . . . . |
$$ . . . . . . . . . . . . . . |
$$ . . . . . . . . O X X X X . |
$$ . . . . , . 1 X O X O O O . |
$$ . 7 . . . . 5 O X O O . O . |
$$ . . . . . . 3 O X X 2 O . . |
$$ . . . . . . . . 6 4 . . . . |
$$ ----------------------------[/go]
this is Terrible for black!
Click Here To Show Diagram Code
[go]$$Bc
$$ . . . . . . . . . . . . . . |
$$ . . . . , . . . . . , . . . |
$$ . . . . X . . . . . . . . . |
$$ . . . . . . . . . . . X . . |
$$ . . . . . . . . . . . . . . |
$$ . . . . . . . . 1 . . . . . |
$$ . . . . . . . . O X X X X . |
$$ . . . . , . X X O X O O O . |
$$ . . . . . . . O X O O . O . |
$$ . . . . . . . O X X 2 O . . |
$$ . . . . . . . . . . . . . . |
$$ ----------------------------[/go]
Ladder is the correct move
Yes, I had edited my post multiple times and everytime I found another mistake. Wasn't my day - sorry ^^
Bill Spight
Honinbo
Posts: 10905
Joined: Wed Apr 21, 2010 1:24 pm
Has thanked: 3651 times
Been thanked: 3373 times

Re: which is a better move in this position?

Post by Bill Spight »

Click Here To Show Diagram Code
[go]$$Bc
$$ . . . . . . . . . . . |
$$ . , . . . . . , . . . |
$$ . X . . . . . . . . . |
$$ . . . . . . . . X . . |
$$ . . . . . . . . . . . |
$$ . . . . . . . . . . . |
$$ . . . . . O X X X X . |
$$ . , . 1 X O X O O O . |
$$ . . . . O X O O . O . |
$$ . . . . O X X . O . . |
$$ . . . . . . . . . . . |
$$ ----------------------[/go]
For a while I thought that :b1: might be the preferable way to capture (on an otherwise empty board), because the side is bigger than either the corner or center.
Click Here To Show Diagram Code
[go]$$Bc
$$ . . . . . . . . . . . |
$$ . , . . . . . , . . . |
$$ . X . . . . . . . . . |
$$ . . . . . . . . X . . |
$$ . . . . . . . . . . . |
$$ . . . . . 3 . . . . . |
$$ . . . . . O X X X X . |
$$ . , . 1 X O X O O O . |
$$ . . 2 . O X O O . O . |
$$ . . . . O X X . O . . |
$$ . . . . . . . . . . . |
$$ ----------------------[/go]
However, :w2: pretty well forces :b3:, now or in the next few moves.
Click Here To Show Diagram Code
[go]$$Bc
$$ . . . . . . . . . . . |
$$ . , . . . . . , . . . |
$$ . X . . . . . . . . . |
$$ . . . . . . . . X . . |
$$ . . . . . . . . . . . |
$$ . . . . . 1 . . . . . |
$$ . . . . 3 O X X X X . |
$$ . , . . X O X O O O . |
$$ . . 2 . O X O O . O . |
$$ . . . . O X X . O . . |
$$ . . . . . . . . . . . |
$$ ----------------------[/go]
This way is better for Black.

In both cases :b1: should be gote on an empty board, however.

Click Here To Show Diagram Code
[go]$$Wc
$$ . . . . . . . . . . . |
$$ . , . . . . . , . . . |
$$ . X . . . . . . . . . |
$$ . . . . . . . . X . . |
$$ . . . . . . . . . . . |
$$ . . . . . 2 . . . . . |
$$ . . . . 4 O X X X X . |
$$ . , . B X O X O O O . |
$$ . . . . O X O O . O . |
$$ . . . . O X X 1 O . . |
$$ . . . . . 5 3 . . . . |
$$ ----------------------[/go]
But if :bc: is gote, it leaves behind :w1:, a nice yose.

So now I am leaning to the atari. :)

OC, if there are stones to the left, that matters greatly.
The Adkins Principle:
At some point, doesn't thinking have to go on?
— Winona Adkins

Visualize whirled peas.

Everything with love. Stay safe.
peppernut
Dies in gote
Posts: 63
Joined: Tue Oct 09, 2012 4:51 am
Rank: 5k
GD Posts: 0
KGS: peppernut
Has thanked: 12 times
Been thanked: 21 times

Re: which is a better move in this position?

Post by peppernut »

Click Here To Show Diagram Code
[go]$$Wc
$$ . , . . . . . , . . . |
$$ . X . . . . . . . . . |
$$ . . . . . . . . X . . |
$$ . . . . . . . . . . . |
$$ . . . . . B . . . . . |
$$ . . . 3 1 O X X X X . |
$$ . , . 2 X O X O O O . |
$$ . . . . O X O O . O . |
$$ . . . . O X X . O . . |
$$ . . . . . . . . . . . |
$$ ----------------------+[/go]
What I don't get is if you're going to do this, why exchange the marked stone for :w1:? Why not :b2: directly?

This line gets complicated. There is a white group cutting 3 black groups, only one of which is strong. I am having trouble seeing why capturing some white stones, connecting your groups, and leaving white with the only weak group isn't clearly right. Yet überdude also likes this move, so there has to be merit to this move that I'm not understanding. Can you explain it?
MMaestro
Dies in gote
Posts: 43
Joined: Tue Sep 20, 2011 12:19 am
Rank: AGA 3D
GD Posts: 0
KGS: 2D
Tygem: 6D
Been thanked: 16 times

Re: which is a better move in this position?

Post by MMaestro »

Depending on the rest of the board, the clamp can also be a viable option if you really don't want white to connect his left side stones to the right side.
User avatar
gogameguru
Lives in gote
Posts: 477
Joined: Sun Jan 09, 2011 9:18 pm
Rank: 5d
GD Posts: 0
Has thanked: 192 times
Been thanked: 357 times
Contact:

Re: which is a better move in this position?

Post by gogameguru »

This is an excellent question and it's worth spending some time pondering it.

@peppernut
peppernut wrote:
Click Here To Show Diagram Code
[go]$$Wc
$$ . , . . . . . , . . . |
$$ . X . . . . . . . . . |
$$ . . . . . . . . X . . |
$$ . . . . . . . . . . . |
$$ . . . . . B . . . . . |
$$ . . . 3 1 O X X X X . |
$$ . , . 2 X O X O O O . |
$$ . . . . O X O O . O . |
$$ . . . . O X X . O . . |
$$ . . . . . . . . . . . |
$$ ----------------------+[/go]
What I don't get is if you're going to do this, why exchange the marked stone for :w1:? Why not :b2: directly?

This line gets complicated. There is a white group cutting 3 black groups, only one of which is strong. I am having trouble seeing why capturing some white stones, connecting your groups, and leaving white with the only weak group isn't clearly right. Yet überdude also likes this move, so there has to be merit to this move that I'm not understanding. Can you explain it?
Click Here To Show Diagram Code
[go]$$Wc
$$ . , . . . . . , . . . |
$$ . X . . . . . . . . . |
$$ . . . . . . . . X . . |
$$ . . . . . . . . . . . |
$$ . . . . . B . . . . . |
$$ . . . 3 1 O X X X X . |
$$ . , . 2 X O X O O O . |
$$ . . . 4 O X O O . O . |
$$ . . . . O X X . O . . |
$$ . . . . . . . . . . . |
$$ ----------------------+[/go]
In that case black plays here now and white doesn't have any particularly good move.
Playing the atari first wins hands down in this case. It's simply better technique.

That's because it creates better shape after capturing the stones, because makes white heavy before 'defending', because it slows white's future development and because it still creates miai. However, the answer to this question can change depending on the position. That's Go for you :).

Here are some less settled (fictitious) positions to illustrate these points more clearly. Assume the ladder favors black in all cases.
Click Here To Show Diagram Code
[go]$$Bc Example 1a: White connects under - 1 looks like a wasted move. (6 at the marked stone)
$$ +---------------------------------------+
$$ | . . . . . . . . . . . . . . . . . . . |
$$ | . . . . . . . . . . . . . . . . . . . |
$$ | . . . . . . . . . . . . . . . . . . . |
$$ | . . . . . . . . . . . . . . . . . . . |
$$ | . . . . . . . . . . . . . . . . . . . |
$$ | . . . . . . . . . . . . . . . . . . . |
$$ | . . . . . . . . . . . . . . . . . . . |
$$ | . . . . . . . . . . . . . . . . . . . |
$$ | . . . . . . . . . . . . . . . . . . . |
$$ | . . . . . . . . . . . . . . . O . . . |
$$ | . . . . . . . . . . . . . . . . . . . |
$$ | . . . . . . . . . . . . . . . . . . . |
$$ | . . . . . . . . . . . . . . . . . . . |
$$ | . . . . . . . . . . . . 3 . . X X . . |
$$ | . . . . . . . . . . . 5 O X . X O . . |
$$ | . . . . . . . . . . 1 X W X . X O . . |
$$ | . . . . . . . . . . . O X O O O O . . |
$$ | . . . . . . . . . . . O X X 2 . . . . |
$$ | . . . . . . . . . . . . . 4 . . . . . |
$$ +---------------------------------------+[/go]
Click Here To Show Diagram Code
[go]$$Bc Exacmple 1b: White connects under - black captured more stones with better shape.
$$ +---------------------------------------+
$$ | . . . . . . . . . . . . . . . . . . . |
$$ | . . . . . . . . . . . . . . . . . . . |
$$ | . . . . . . . . . . . . . . . . . . . |
$$ | . . . . . . . . . . . . . . . . . . . |
$$ | . . . . . . . . . . . . . . . . . . . |
$$ | . . . . . . . . . . . . . . . . . . . |
$$ | . . . . . . . . . . . . . . . . . . . |
$$ | . . . . . . . . . . . . . . . . . . . |
$$ | . . . . . . . . . . . . . . . . . . . |
$$ | . . . . . . . . . . . . . . . O . . . |
$$ | . . . . . . . . . . . . . . . . . . . |
$$ | . . . . . . . . . . . . . . . . . . . |
$$ | . . . . . . . . . . . . . . . . . . . |
$$ | . . . . . . . . . . . 5 1 . . X X . . |
$$ | . . . . . . . . . . 7 2 O X . X O . . |
$$ | . . . . . . . . . . 3 X O X . X O . . |
$$ | . . . . . . . . . . . O X O O O O . . |
$$ | . . . . . . . . . . . O X X 4 . . . . |
$$ | . . . . . . . . . . . . 8 6 . . . . . |
$$ +---------------------------------------+[/go]
Click Here To Show Diagram Code
[go]$$Bc Example 2a: White resists - black's enclosed.
$$ +---------------------------------------+
$$ | . . . . . . . . . . . . . . . . . . . |
$$ | . . . . . . . . . . . . . . . . . . . |
$$ | . . . . . . . . . . . . . . . . . . . |
$$ | . . . . . . . . . . . . . . . . . . . |
$$ | . . . . . . . . . . . . . . . . . . . |
$$ | . . . . . . . . . . . . . . . . . . . |
$$ | . . . . . . . . . . . . . . . . . . . |
$$ | . . . . . . . . . . . . . . . . . . . |
$$ | . . . . . . . . . . . . . . . . . . . |
$$ | . . . . . . . . . . . . . . . O . . . |
$$ | . . . . . . . . . . . . 4 . . . . . . |
$$ | . . . . . . . . . . . . . . . . . . . |
$$ | . . . . . . . . . . . . . . . . . . . |
$$ | . . . . . . . . . . . . 2 . . X X . . |
$$ | . . . . . . . . . . . . O X . X O . . |
$$ | . . . . . . . . . . 1 X O X . X O . . |
$$ | . . . . . . . . . . . O X O O O O . . |
$$ | . . . . . . . . . . 3 O X X . . . . . |
$$ | . . . . . . . . . . . . . . . . . . . |
$$ +---------------------------------------+[/go]
Click Here To Show Diagram Code
[go]$$Bc Example 2b: White resists - white's development is slowed by 1.
$$ +---------------------------------------+
$$ | . . . . . . . . . . . . . . . . . . . |
$$ | . . . . . . . . . . . . . . . . . . . |
$$ | . . . . . . . . . . . . . . . . . . . |
$$ | . . . . . . . . . . . . . . . . . . . |
$$ | . . . . . . . . . . . . . . . . . . . |
$$ | . . . . . . . . . . . . . . . . . . . |
$$ | . . . . . . . . . . . . . . . . . . . |
$$ | . . . . . . . . . . . . . . . . . . . |
$$ | . . . . . . . . . . . . . . . . . . . |
$$ | . . . . . . . . . . . . . . . O . . . |
$$ | . . . . . . . . . . . . . . 7 . . . . |
$$ | . . . . . . . . . . . e . . . . . . . |
$$ | . . . . . . . . . . . . 6 . . . . . . |
$$ | . . . . . . . . . . . 4 1 . . X X . . |
$$ | . . . . . . . . . . b 2 O X . X O . . |
$$ | . . . . . . . . . . 3 X O X . X O . . |
$$ | . . . . . . . . . . 5 O X O O O O . . |
$$ | . . . . . . . . c . a O X X d . . . . |
$$ | . . . . . . . . . . . . . . . . . . . |
$$ +---------------------------------------+[/go]
Black has gained a little extra time to move here, because of the exchange of 1 for 2. If 6 is at 'e', black still plays 7.
[Updated and fixed mistake where I kept saying white instead of black. Thanks friendly editor ;)]

(note: 5 is better than 'a' for fighting here. Play 5 when you expect fighting in the center. Now 'b' isn't sente, but 'c' is sente instead and 'd' is sente in either case.)
Click Here To Show Diagram Code
[go]$$B Example 2c: White resists - enclosing doesn't work anymore.
$$ +---------------------------------------+
$$ | . . . . . . . . . . . . . . . . . . . |
$$ | . . . . . . . . . . . . . . . . . . . |
$$ | . . . . . . . . . . . . . . . . . . . |
$$ | . . . . . . . . . . . . . . . . . . . |
$$ | . . . . . . . . . . . . . . . . . . . |
$$ | . . . . . . . . . . . . . . . . . . . |
$$ | . . . . . . . . . . . . . . . . . . . |
$$ | . . . . . . . . . . . . . . . . . . . |
$$ | . . . . . . . . . . . . . . . . . . . |
$$ | . . . . . . . . . . . . . . . O . . . |
$$ | . . . . . . . . . . . . 6 . . . . . . |
$$ | . . . . . . . . . . b 9 a . . . . . . |
$$ | . . . . . . . . . . . 8 7 . . . . . . |
$$ | . . . . . . . . . . . 4 1 . . X X . . |
$$ | . . . . . . . . . . d 2 O X . X O . . |
$$ | . . . . . . . . . . 3 X O X . X O . . |
$$ | . . . . . . . . . . 5 O X O O O O . . |
$$ | . . . . . . . . . . c O X X . . . . . |
$$ | . . . . . . . . . . . . . . . . . . . |
$$ +---------------------------------------+[/go]
Now 'a' and 'b' are miai for black and white's too thin to fight like this. Note that if white cuts at 'a' and black extends to 'b', white's cutting stones are captured. However, if black had played 'c' instead of 5 earlier, white would be able to escape with 'd' and black would be in trouble. This illustrates the subtle difference between those two moves. A lot of people think 5 looks less stylish, but it's the fighting move.

Now let's consider another position:
Click Here To Show Diagram Code
[go]$$ Example 3: Black to play.
$$ +---------------------------------------+
$$ | . . . . . . . . . . . . . . . . . . . |
$$ | . . . . . . . . . . . . . . . . . . . |
$$ | . . . . . . . . . . . . . . . . . . . |
$$ | . . . . . . . . . . . . . . . . . . . |
$$ | . . . . . . . . . . . . . . . . . . . |
$$ | . . . . . . . . . . . . . . . . . . . |
$$ | . . . . . . . . . . . . . . . . . . . |
$$ | . . . . . . . . . . . . . . . . . . . |
$$ | . . . . . . . . . . . . . . . . . . . |
$$ | . . . . . . . . . . . . . . . . . . . |
$$ | . . . . . . . . . . . . . . . . . . . |
$$ | . . . . . . . . . . . . . . . . . . . |
$$ | . . . . . . . . . . . . . . . . . . . |
$$ | . . . . . . . . . . . . . . . . . . . |
$$ | . . . . . . . . . . . . . O X X X X . |
$$ | . . . . . . . . . . . . X O X O O O . |
$$ | . . . . . . . . . . . . O X O O . . . |
$$ | . . . . . . . . . . . . O X X . . . . |
$$ | . . . . . . . . . . . . . . . . . . . |
$$ +---------------------------------------+[/go]
Click Here To Show Diagram Code
[go]$$Bc Example 3a: White connects under - black's position is good.
$$ +---------------------------------------+
$$ | . . . . . . . . . . . . . . . . . . . |
$$ | . . . . . . . . . . . . . . . . . . . |
$$ | . . . . . . . . . . . . . . . . . . . |
$$ | . . . . . . . . . . . . . . . . . . . |
$$ | . . . . . . . . . . . . . . . . . . . |
$$ | . . . . . . . . . . . . . . . . . . . |
$$ | . . . . . . . . . . . . . . . . . . . |
$$ | . . . . . . . . . . . . . . . . . . . |
$$ | . . . . . . . . . . . . . . . . . . . |
$$ | . . . . . . . . . . . . . . . . . . . |
$$ | . . . . . . . . . . . . . . . . . . . |
$$ | . . . . . . . . . . . . . . . . . . . |
$$ | . . . . . . . . . . . . . . . . . . . |
$$ | . . . . . . . . . . . . 5 1 . . . . . |
$$ | . . . . . . . . . . . 7 2 O X X X X . |
$$ | . . . . . . . . . . . 3 X O X O O O . |
$$ | . . . . . . . . . . . . O X O O . . . |
$$ | . . . . . . . . . . . . O X X 4 . . . |
$$ | . . . . . . . . . . . . . 8 6 . . . . |
$$ +---------------------------------------+[/go]
Based on the previous diagrams, you might think that this is a good way for black to play, and you'd be right.

However, note that white's corner is unsettled. If you like to fight, there's another way to play here.
Click Here To Show Diagram Code
[go]$$Bc Example 3b: 1 prevents white from connecting under.
$$ +---------------------------------------+
$$ | . . . . . . . . . . . . . . . . . . . |
$$ | . . . . . . . . . . . . . . . . . . . |
$$ | . . . . . . . . . . . . . . . . . . . |
$$ | . . . . . . . . . . . . . . . . . . . |
$$ | . . . . . . . . . . . . . . . . . . . |
$$ | . . . . . . . . . . . . . . . . . . . |
$$ | . . . . . . . . . . . . . . . . . . . |
$$ | . . . . . . . . . . . . . . . . . . . |
$$ | . . . . . . . . . . . . . . . . . . . |
$$ | . . . . . . . . . . . . . . . . . . . |
$$ | . . . . . . . . . . . . . . . . . . . |
$$ | . . . . . . . . . . . . . . . . . . . |
$$ | . . . . . . . . . . . . . . . . . . . |
$$ | . . . . . . . . . . . . . 5 . . . . . |
$$ | . . . . . . . . . . . . 7 O X X X X . |
$$ | . . . . . . . . . . . 3 X O X O O O . |
$$ | . . . . . . . . . . 4 2 O X O O . . . |
$$ | . . . . . . . . . . . 1 O X X 6 . . . |
$$ | . . . . . . . . . . . . . . . . . . . |
$$ +---------------------------------------+[/go]
Sacrificing 1 costs black something and strengthens white's four stone group (which has to be considered because it diminishes the value of separating white in the first place). However, it can't be denied that white's groups have been separated and white will have to make four eyes instead of two now. Black's shape is worse now too.

This is a fighting variation which can be good if the global position supports this sort of strategy.

Here's one final example:
Click Here To Show Diagram Code
[go]$$Bc Example 4a: 1 and 3 is the technique here.
$$ +---------------------------------------+
$$ | . . . . . . . . . . . . . . . . . . . |
$$ | . . . . . . . . . . . . . . . . . . . |
$$ | . . . . . . . . . . . . . . . . . . . |
$$ | . . . . . . . . . . . . . . . . . . . |
$$ | . . . . . . . . . . . . . . . . . . . |
$$ | . . . . . . . . . . . . . . . . . . . |
$$ | . . . . . . . . . . . . . . . . . . . |
$$ | . . . . . . . . . . . . . . . . . . . |
$$ | . . . . . . . . . . . . . . . . . . . |
$$ | . . . . . . . . . . . . . . . . . . . |
$$ | . . . . . . . . . . . . . . . . . . . |
$$ | . . . . . . . . . . . . . . . . . . . |
$$ | . . . . . . . . . . . . . . . . . . . |
$$ | . . . . . . . . . . . . 3 . . . . . . |
$$ | . . . . . . . . . . . . O X . X . . . |
$$ | . . . . . . . . . . 1 X O X . . . . . |
$$ | . . . . . . . . . . O O X O . O . . . |
$$ | . . . . . . . . . . 2 X X O . . . . . |
$$ | . . . . . . . . . . . . . . . . . . . |
$$ +---------------------------------------+[/go]
Years ago, I remember I thought for a little while that this situation was basically the same as in the examples above :oops:, but...

Click Here To Show Diagram Code
[go]$$Bc Example 4b: If you ask for too much, you'll get burned.
$$ +---------------------------------------+
$$ | . . . . . . . . . . . . . . . . . . . |
$$ | . . . . . . . . . . . . . . . . . . . |
$$ | . . . . . . . . . . . . . . . . . . . |
$$ | . . . . . . . . . . . . . . . . . . . |
$$ | . . . . . . . . . . . . . . . . . . . |
$$ | . . . . . . . . . . . . . . . . . . . |
$$ | . . . . . . . . . . . . . . . . . . . |
$$ | . . . . . . . . . . . . . . . . . . . |
$$ | . . . . . . . . . . . . . . . . . . . |
$$ | . . . . . . . . . . . . . . . . . . . |
$$ | . . . . . . . . . . . . . . . . . . . |
$$ | . . . . . . . . . . . . . . . . . . . |
$$ | . . . . . . . . . . . . . . . . . . . |
$$ | . . . . . . . . . a . . 1 . . . . . . |
$$ | . . . . . . . . . . 4 2 O X . X . . . |
$$ | . . . . . . . . . 5 3 X O X . . . . . |
$$ | . . . . . . . . . . O O X O . O . . . |
$$ | . . . . . . . . . . 6 X X O . . . . . |
$$ | . . . . . . . . . . . . . . . . . . . |
$$ +---------------------------------------+[/go]
It's not.

White can play a makeshift defense with 4, then play 6, and black practically collapses. All black can do now is try desperately to recover with a squeeze at 'a'. It might be good enough to keep playing for awhile, but it doesn't really work well enough. Black lost a lot here.
Last edited by gogameguru on Sun Dec 16, 2012 5:52 am, edited 1 time in total.
Post Reply