It is currently Thu May 15, 2025 10:52 am

All times are UTC - 8 hours [ DST ]


Post new topic Reply to topic  [ 25 posts ]  Go to page 1, 2  Next
Author Message
Offline
 Post subject: Opening Theory Made Easy
Post #1 Posted: Sat Feb 16, 2013 4:03 pm 
Dies in gote

Posts: 44
Liked others: 70
Was liked: 0
Rank: KGS 11 kyu
KGS: cherryhill
Kaya handle: cherryhill
is this too broad a topic? i am studying this book right now and thought it might be helpful to start a topic about its principles to clarify some stuff as i go through it. for now i just have one question but i probably will have many more. overall i think it is a great great book.

so the first principle. otake talks about extending from corner enclosures and what the primary direction for an extension is based off of the enclosure.

Click Here To Show Diagram Code
[go]$$ ---------------------------------------
$$ | . . . . . . . . . . . . . . . . . . . |
$$ | . . . . . . . . . . . . . . . . . . . |
$$ | . . . . . . . . . X . . . . B . . . . |
$$ | . . . , . . . . . , . . . . . , X . . |
$$ | . . . . . . . . . X . . . . . . . . . |
$$ | . . . . . . . . . . . . . . . . . . . |
$$ | . . . . . . . . . . . . . . . . . . . |
$$ | . . . . . . . . . . . . . . . . . . . |
$$ | . . . . . . . . . . . . . . . . . . . |
$$ | . . . , . . . . . , . . . . O , W . . |
$$ | . . . . . . . . . . . . . . . . . . . |
$$ | . . . . . . . . . . . . . . . . . . . |
$$ | . . . . . . . . . . . . . . . . . . . |
$$ | . . . . . . . . . . . . . . . . . . . |
$$ | . . . . . . . . . . . . . . . . . . . |
$$ | . . . , . . . . . , . . . . O , O . . |
$$ | . . . . . . . . . . . . . . . . . . . |
$$ | . . . . . . . . . . . . . . . . . . . |
$$ | . . . . . . . . . . . . . . . . . . . |
$$ ---------------------------------------[/go]


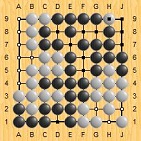
the white circle is the primary direction for both enclosures. blacks extension (not accounting for the fact that white circle is a key point for both in this diagram) is slightly inferior than whites because of the marked stone for black. i would like to talk about this.

the first time i read this chapter i think i was confused that i thought primary direction had to do with the gaps between the stones at the extension and the corner being balanced, with the star point being between both. but otake talks about the reason blacks extension here is inferior is because of the lowness of the marked black stone. i am a little confused as to what this means as arent both stones on a third line depending on where you're looking? what i mean is an extension in the primary direction, the stone in the enclosure you're extending from would also be on a 3rd line. that is what i thought lowness to mean. i wonder if the lowness means that the extension is too narrow? if the marked stone was at 3-4 instead of 3-5 would the extension be in the primary direction? are both stones in the enclosure the problem? i just wonder what it is about the marked stone that makes the extension inferior because i don't understand what he means by the lowness of it.

Top
 Profile  
 
Offline
 Post subject: Re: Opening Theory Made Easy
Post #2 Posted: Sat Feb 16, 2013 5:49 pm 
Lives with ko

Posts: 276
Liked others: 301
Was liked: 127
It's about developing your stones, and going in a direction that has more potential, in terms of future territory.

Click Here To Show Diagram Code
[go]$$c
$$ ---------------------------------------
$$ | . . . . . . . . . . . . . . . . . . . |
$$ | . . . . . . . . . . . . . . . . . . . |
$$ | . . . . . . . . . X . . . . B . . . . |
$$ | . . . , . . . . . , . . . . . , X . . |
$$ | . . . . . . . . . X . . . . . . . . . |
$$ | . . . . . . . . . . . . . . . . . . . |
$$ | . . . . . . . . . . . . . . . . . . . |
$$ | . . . . . . . . . . . . . . . . . . . |
$$ | . . . . . . . . . . . . . . . . . . . |
$$ | . . . , . . . . . , . . . . O , O . . |
$$ | . . . . . . . . . . . . . . . . . . . |
$$ | . . . . . . . . . . . . . . . . . . . |
$$ | . . . . . . . . . . . . . . . . . . . |
$$ | . . . . . . . . . . . . . . . . . . . |
$$ | . . . . . . . . . . . . . . . . . . . |
$$ | . . . , . . . . . , . . . . O , O . . |
$$ | . . . . . . . . . . . . . . . . . . . |
$$ | . . . . . . . . . . . . . . . . . . . |
$$ | . . . . . . . . . . . . . . . . . . . |
$$ ---------------------------------------[/go]


In your diagram, the marked stone is 'low' in the sense that viewed from the top, it's on the third line, and has a nearby stone on the fourth line.

Viewed from the side, however, you'll see it as a stone on the fifth line with a nearby stone on the third line - an important one-line difference.

The "box-like shape" idea is simply about efficiency. If you want to make territory on the sides, the best way to do so with the minimum stones is with three straight lines of stones. You might as well start aiming for that kind of shape from the start. ;-)

I don't much like "Opening Theory Made Easy", because I find it very jumpy and incomplete. That being said, I can't think of another title to recommend for understanding the opening...

Edit: Another thing I would like to add is that going for a 'box' shape instead of a 'tray' shape tends to establish stronger, higher and meaner sector lines. Either way, you're aiming for maximum potential in the long run.


This post by Phoenix was liked by: cherryhill
Top
 Profile  
 
Offline
 Post subject: Re: Opening Theory Made Easy
Post #3 Posted: Sat Feb 16, 2013 9:20 pm 
Oza
User avatar

Posts: 2659
Liked others: 310
Was liked: 631
Rank: kgs 6k
The question is partly, which looks easier to invade and/or reduce??

Click Here To Show Diagram Code
[go]$$c This is a label for the diagram.
$$ ---------------------------------------
$$ | . . . . . . . . . . . . . . . . . . . |
$$ | . . . . . . . . . . . . . . . . . . . |
$$ | . . . . . . X . . . . . . . . . . . . |
$$ | . . . , . . . . . , . X . X . , . . . |
$$ | . . . . . . X . . . . . . . . . . . . |
$$ | . . . . . . . . . . . . . . . . . . . |
$$ | . . . . . . . . . . . . . . . . . . . |
$$ | . . . . . . . . . . . . . . ... . . |
$$ | . . . . . . . . . . . . . . . . . . . |
$$ | . . . , . . . . . , . . . . . , . . . |
$$ | . . . . . . . . . . . . . . . . . . . |
$$ | . . . . . . . . . . . . . . . . . . . |
$$ | . . . . . . . . . . . . . . . . . . . |
$$ | . . . . . . . . . . . . . . ... . . |
$$ | . . . . . .O . . . ..O . . . . . . |
$$ | . . . , . . . . . , . . . . . , . . . |
$$ | . . . . . .O . . . . .O . . . . . . |
$$ | . . . . . . . . . . . . . . . . . . . |
$$ | . . . . . . . . . . . . . . . . . . . |
$$ ---------------------------------------[/go]


This diagram should suggest which one is easier to invade.

Click Here To Show Diagram Code
[go]$$c This is a label for the diagram.
$$ ---------------------------------------
$$ | . . . . . . . . . . . . . . . . . . . |
$$ | . . . . . . . . . . . b . . . . . . . |
$$ | . . . . . . X . . 4 . . . . . . . . . |
$$ | . . . , . . . . . , . X . X . , . . . |
$$ | . . . . . . 5 . . a . . . . . . . . . |
$$ | . . . . . . . . . . . . . . . . . . . |
$$ | . . . . . . . . . . . . . . . . . . . |
$$ | . . . . . . . . . . . . . . ... . . |
$$ | . . . . . . . . . . . . . . . . . . . |
$$ | . . . , . . . . . , . . . . . , . . . |
$$ | . . . . . . . . . . . . . . . . . . . |
$$ | . . . . . . . . . . . . . . . . . . . |
$$ | . . . . . . . . . . . . . . . . . . . |
$$ | . . . . . . . . . . . . . . ... . . |
$$ | . . . . . .O . . . ..2 . . . . . . |
$$ | . . . , . . . . . , . . . . . , . . . |
$$ | . . . . . .O . . 1 . .O . . . . . . |
$$ | . . . . . . . . . . . . . . . . . . . |
$$ | . . . . . . . . . . . . . . . . . . . |
$$ ---------------------------------------[/go]


This is a super-simplistic picture of what the stupidest possible reduction would look like.

Click Here To Show Diagram Code
[go]$$c This is a label for the diagram.
$$ ---------------------------------------
$$ | . . . . . . . . . . . . . . . . . . . |
$$ | . . . . . . . . . . . . . . . . . . . |
$$ | . . . . . . X . . . . . . . . . . . . |
$$ | . . . , . . . 9 7 5 3 X . X . , . . . |
$$ | . . . . . . X 8 6 4 2 . . . . . . . . |
$$ | . . . . . . . . . . . . . . . . . . . |
$$ | . . . . . . . . . . . . . . . . . . . |
$$ | . . . . . . . . . . . . . . ... . . |
$$ | . . . . . . . . . . . . . . . . . . . |
$$ | . . . , . . . . . , . . . . . , . . . |
$$ | . . . . . . . . . . . . . . . . . . . |
$$ | . . . . . . . . . . . . . . . . . . . |
$$ | . . . . . . . . . . . . . . . . . . . |
$$ | . . . . . . . 1 3 5 7 9 . . ... . . |
$$ | . . . . . .O 2 4 6 80O . . . . . . |
$$ | . . . , . . . . . , . . . . . , . . . |
$$ | . . . . . .O . . . . .O . . . . . . |
$$ | . . . . . . . . . . . . . . . . . . . |
$$ | . . . . . . . . . . . . . . . . . . . |
$$ ---------------------------------------[/go]


This post by jts was liked by 4 people: Amelia, Bonobo, cherryhill, Phelan
Top
 Profile  
 
Offline
 Post subject: Re: Opening Theory Made Easy
Post #4 Posted: Sun Feb 17, 2013 3:54 am 
Gosei
User avatar

Posts: 1378
Location: wHam!lton, Aotearoa
Liked others: 253
Was liked: 105
To paraphrase Phoenix slightly, if you think of an enclosure as a wall the primary direction is the one the wall faces.

_________________
Revisiting Go - Study Journal
My Programming Blog - About the evolution of my go bot.


This post by Loons was liked by 3 people: Bonobo, cherryhill, Phoenix
Top
 Profile  
 
Offline
 Post subject:
Post #5 Posted: Sun Feb 17, 2013 4:36 am 
Honinbo
User avatar

Posts: 8859
Location: Santa Barbara, CA
Liked others: 349
Was liked: 2076
GD Posts: 312
One beautiful thing about of Go is its visual aspects. :)
We start with this corner shape for Black, and we limit our choices to (a) and (b) --
we ask, which one is better for Black, (a) or (b) ?
Click Here To Show Diagram Code
[go]$$
$$ | . . . . . . . . . . . . . . . . . . . |
$$ | . . . . . . . . . . . . . . . . . . . |
$$ | . . . , . . . . . , . . . . . , b . . |
$$ | . . . . . . . . . . . . . . . . . . . |
$$ | . . . . . . . . . . . . . . . . . . . |
$$ | . . . . . . . . . . . . . . . . . . . |
$$ | . . . . . . . . . . . . . . . . . . . |
$$ | . . . . . . . . . . . . . . . . . . . |
$$ | . . . , . . . . . , . . . . . , X . . |
$$ | . . . . . . . . . a . . . . X . . . . |
$$ | . . . . . . . . . . . . . . . . . . . |
$$ | . . . . . . . . . . . . . . . . . . . |
$$ -----------------------------------------[/go]

Instead of getting confused and jangled up by terms like "primary", "secondary",
"high", "low", "facing this", "facing that", "reduce", "invade", etc.,
ask yourself which triangle you prefer as Black: the one with :bc:, or the one with :bt::
Click Here To Show Diagram Code
[go]$$
$$ | . . . . . . . . . . . . . . . . . . . |
$$ | . . . . . . . . . . . . . . . . . . . |
$$ | . . . , . . . . . , . . . . . , Y . . |
$$ | . . . . . . . . . . . . . . . . . . . |
$$ | . . . . . . . . . . . . . . . . . . . |
$$ | . . . . . . . . . . . . . . . . . . . |
$$ | . . . . . . . . . . . . . . . . . . . |
$$ | . . . . . . . . . . . . . . . . . . . |
$$ | . . X , . . . . . , . . . . . , X . . |
$$ | . . . . X . . . . B . . . . X . . . . |
$$ | . . . . . . . . . . . . . . . . . . . |
$$ | . . . . . . . . . . . . . . . . . . . |
$$ -----------------------------------------
$$ {LN R4 R10}
$$ {LN R10 P3}
$$ {LN P3 R4}
$$ {LN E3 K3}
$$ {LN K3 C4}
$$ {LN C4 E3}[/go]
And if we add a fourth corner to each figure, which one you prefer as Black:
Click Here To Show Diagram Code
[go]$$
$$ | . . . . . . . . . . . . . . . . . . . |
$$ | . . . . . . . . . . . . . . . . . . . |
$$ | . . . , . . . . . , . . . . X , Y . . |
$$ | . . . . . . . . . . . . . . . . . . . |
$$ | . . . . . . . . . . . . . . . . . . . |
$$ | . . . . . . . . . . . . . . . . . . . |
$$ | . . . . . . . . . . . . . . . . . . . |
$$ | . . . . . . . . . . . . . . . . . . . |
$$ | . . X , . . . . . X . . . . . , X . . |
$$ | . . . . X . . . . B . . . . X . . . . |
$$ | . . . . . . . . . . . . . . . . . . . |
$$ | . . . . . . . . . . . . . . . . . . . |
$$ -----------------------------------------
$$ {LN R4 R10}
$$ {LN R10 P10}
$$ {LN P10 P3}
$$ {LN P3 R4}
$$ {LN E3 K3}
$$ {LN K3 K4}
$$ {LN K4 C4}
$$ {LN C4 E3}[/go]
If you're still not clear whether :bt: or :bc: is better for Black, let us know. :)


This post by EdLee was liked by 6 people: Amelia, Bonobo, cherryhill, Phelan, Phoenix, zenith
Top
 Profile  
 
Offline
 Post subject: Re: Opening Theory Made Easy
Post #6 Posted: Sun Feb 17, 2013 9:06 pm 
Oza
User avatar

Posts: 2659
Liked others: 310
Was liked: 631
Rank: kgs 6k
Loons wrote:
To paraphrase Phoenix slightly, if you think of an enclosure as a wall the primary direction is the one the wall faces.

This is an excellent point, and not just a metaphor. An enclosure will often become a wall after an invasion or a probe in the corner.


This post by jts was liked by 2 people: Phelan, Phoenix
Top
 Profile  
 
Offline
 Post subject: Re: Opening Theory Made Easy
Post #7 Posted: Mon Feb 18, 2013 1:55 am 
Dies in gote

Posts: 44
Liked others: 70
Was liked: 0
Rank: KGS 11 kyu
KGS: cherryhill
Kaya handle: cherryhill
very helpful guys, thanks!

i am having a bit of trouble understanding principle 6 which aims to explain the difference between the 3rd line being for completion and the 4th which is for development. he offers these two diagrams as a comparison.

Click Here To Show Diagram Code
[go]$$ ---------------------------------------
$$ | . . . . . . . . . . . . . . . . . . . |
$$ | . . . . . . . . . . . . . . . . . . . |
$$ | . . . O O X . . . . . . . . . . . . . |
$$ | . . W , X X . . . X . . . . . , . . . |
$$ | . . . . . . . . . . . . . . . . . . . |
$$ | . . W . . . . . . . . . . . . . . . . |
$$ | . . . . . . . . . . . . . . . . . . . |
$$ | . . . . . . . . . . . . . . . . . . . |
$$ | . . . . . . . . . . . . . . . . . . . |
$$ | . . B , . . . . . , . . . . . , . . . |
$$ | . . . . . . . . . . . . . . . . . . . |
$$ | . . . . . . . . . . . . . . . . . . . |
$$ | . . . . . . . . . . . . . . . . . . . |
$$ | . . . X . . . . . . . . . . . . . . . |
$$ | . . . . . . . . . . . . . . . . . . . |
$$ | . . . X . . . . . O . . . . . , . . . |
$$ | . . . . . O . . . . . . . . . . . . . |
$$ | . . . . . . . . . . . . . . . . . . . |
$$ | . . . . . . . . . . . . . . . . . . . |
$$ ---------------------------------------[/go]


Click Here To Show Diagram Code
[go]$$ ---------------------------------------
$$ | . . . . . . . . . . . . . . . . . . . |
$$ | . . . . . . . . . . . . . . . . . . . |
$$ | . . . O O X . . . . . . . . . . . . . |
$$ | . . W , X X . . . X . . . . . , . . . |
$$ | . . . . . . . . . . . . . . . . . . . |
$$ | . . W . . . . . . . . . . . . . . . . |
$$ | . . . . . . . . . . . . . . . . . . . |
$$ | . . . . . . . . . . . . . . . . . . . |
$$ | . . . . . . . . . . . . . . . . . . . |
$$ | . . . , . . . . . , . . . . . , . . . |
$$ | . . . . . . . . . . . . . . . . . . . |
$$ | . . . . . . . . . . . . . . . . . . . |
$$ | . . . . . . . . . . . . . . . . . . . |
$$ | . . X . . . . . . . . . . . . . . . . |
$$ | . . . . . . . . . . . . . . . . . . . |
$$ | . . . X . . . . . . . . . . . , . . . |
$$ | . . X . . O . . O . . . . . . . . . . |
$$ | . . . O . . . . . . . . . . . . . . . |
$$ | . . . . . . . . . . . . . . . . . . . |
$$ ---------------------------------------[/go]


so otake says the first diagram is inferior to the second because the two marked white stones mean that the marked black stone doesnt have much potential for farther expansion (though its on the 3rd line, which i thought mean it was there to complete something based on this principle? otake seems to imply the intention of this stone is for development... i don't see how it isnt actually working as completion here) and that the 2nd diagram is better. i really don't understand this for a number of reasons.

first, it just seems like the first diagram covers a lot more territory and that the second gives white a lot of room for an extension. otake talks about how if you don't play the marked black stone in the first diagram you are asking for trouble but it seems like the 2nd diagram doesnt play this stone yet is better for it?

second, the second diagram, it assumes (literally in the text, it goes, IF white 2 & 4 then the exchange is over and white is solid) white will follow the joseki, which it doesnt in the first diagram. there is an earlier principle that discusses the possibility of white doing what it does in the d1 by not following the joseki but by extending to the star point. there is no discussion about what might happen if you respond to the approach with the knights move like in d2 and white doesnt respond with the standard joseki. here it just seems like two different scenarios with different variables are being compared where in the first white is being difficult but in the 2nd white isn't. it makes it harder for me to see the benefit.

third, i have read this chapter a few times... besides believing (because i do) the idea, theoretically, that the 4th line is for development and the 3rd is for completion, i don't understand it based on the examples given. i don't see for instance, why the marked black stone in d1 isn't "completing" the shape by being on the third line as it is. it seems like according to the principle it should be completing something since its on the third line. i just don't understand whats wrong with it and why it isnt completing territory, roughly, as it appears to be.

Top
 Profile  
 
Offline
 Post subject: Re: Opening Theory Made Easy
Post #8 Posted: Mon Feb 18, 2013 2:45 am 
Gosei
User avatar

Posts: 1810
Liked others: 490
Was liked: 365
Rank: KGS 1-dan
cherryhill wrote:
first, it just seems like the first diagram covers a lot more territory and that the second gives white a lot of room for an extension. otake talks about how if you don't play the marked black stone in the first diagram you are asking for trouble but it seems like the 2nd diagram doesnt play this stone yet is better for it?


Did you read the whole Principle-Six-chapter to the end?
Because in diagramme 5 and in diagramme 7 and onwards Otake explains the weaknesses of the high corner enclosure (it deals more with the high Shimari enclosure but the principle is quite similiar).

As fas as territory is concerned, the high corner enclosure in this diagramme offers not per se more territory but has a lot more potential than the low corner enclosure.
Click Here To Show Diagram Code
[go]$$Bc a to c or common invasion points.
$$ ---------------------------------------
$$ | . . . . . . . . . . . . . . . . . . . |
$$ | . . . . . . . . . . . . . . . . . . . |
$$ | . . . O O X . . . . . . . . . . . . . |
$$ | . . W , X X . . . X . . . . . , . . . |
$$ | . . . . . . . . . . . . . . . . . . . |
$$ | . . W . . . . . . . . . . . . . . . . |
$$ | . . . . . . . . . . . . . . . . . . . |
$$ | . . . . . . . . . . . . . . . . . . . |
$$ | . . . . . . . . . . . . . . . . . . . |
$$ | . . X , . . . . . , . . . . . , . . . |
$$ | . . . . . . . . . . . . . . . . . . . |
$$ | . . c . . . . . . . . . . . . . . . . |
$$ | . . . b . . . . . . . . . . . . . . . |
$$ | . . . X . . . . . . . . . . . . . . . |
$$ | . . . . . . . . . . . . . . . . . . . |
$$ | . . . X . . . . . O . . . . . , . . . |
$$ | . . a . . O . . . . . . . . . . . . . |
$$ | . . . . . . . . . . . . . . . . . . . |
$$ | . . . . . . . . . . . . . . . . . . . |
$$ ---------------------------------------[/go]


cherryhill wrote:
second, the second diagram, it assumes (literally in the text, it goes, IF white 2 & 4 then the exchange is over and white is solid) white will follow the joseki, which it doesnt in the first diagram. there is an earlier principle that discusses the possibility of white doing what it does in the d1 by not following the joseki but by extending to the star point. there is no discussion about what might happen if you respond to the approach with the knights move like in d2 and white doesnt respond with the standard joseki. here it just seems like two different scenarios with different variables are being compared where in the first white is being difficult but in the 2nd white isn't. it makes it harder for me to see the benefit.


You should focus on Black's position for the moment.
To clarify first the "third is for completion" and "the fourth line is for developement" thingy: If you look at diagramme 5 in in this chapter in Opening Theory Made Easy you'll see what Otake means with Black omiting the third line extension would be painful for Black. So to complete his position Black needs to make an extension from his fourth line stone (extension = development) to the third line (third line = completion).
But this extension is of low value because White is strong and low on the top, so despite Black making locally the right move, it just defends and has very little impact on White (e.g. no attack) or Black's further game (no follow-up, the stone offers no possibilities). A move that serves just one purpose and above all if this one purpose is only defending, then the move is generally speaking not very efficient.
Moves, especially in the opening stage, should aim at a follow-up, they should have more meaning in them.

With this in mind, White does not want to exchange D2 for C3 as in your second diagramme. It will only solidify Black unneccessarily (it adds more stones to Black's position, so it ought to become stronger ^^) and White would like to keep all his options. Since Black already played a inferior variation, White should be patient and see how he can get the most of this. E.g. which point a to c he will play later on.

cherryhill wrote:
third, i have read this chapter a few times... besides believing (because i do) the idea, theoretically, that the 4th line is for development and the 3rd is for completion, i don't understand it based on the examples given. i don't see for instance, why the marked black stone in d1 isn't "completing" the shape by being on the third line as it is. it seems like according to the principle it should be completing something since its on the third line. i just don't understand whats wrong with it and why it isnt completing territory, roughly, as it appears to be.


No, you understand it just fine. But the example goes a little bit deeper than that. The extension to the third line in you diagramme 1 does complete Black's shape, but see above it has very little value in itself.
So Otake says, it is much better to play on the third line (third = completion, no further move neccessary) immediately (your second diagramme) when White approaches because an extension along the side is not big but when Black plays high it is urgent otherwise White will approach again and Black's stones are floating (see Otake's diagramme 5).

In a nutshell: A stone on the fourth line not only aims to make an extension (development) to the third line, it also requieres it to a certain degree (see again Otake's diagramme 5). But at the same time if you have to make an extension to complete your shape, this extension should have more meaning than just having to defend/complete a fourth line stone. This is about efficiency (see Otake's diagramme 3 and 4).
I would recommend you read this chapter again, because I think Otake actually answers all your questions =)

_________________
My "guide" to become stronger in Go


This post by SoDesuNe was liked by: cherryhill
Top
 Profile  
 
Offline
 Post subject: Re: Opening Theory Made Easy
Post #9 Posted: Mon Feb 18, 2013 3:36 am 
Dies in gote

Posts: 44
Liked others: 70
Was liked: 0
Rank: KGS 11 kyu
KGS: cherryhill
Kaya handle: cherryhill
hm i have read the chapter twice more since reading your post. i am still struggling with it. i think maybe my understanding of auxiliary principles relating to this one are maybe holding me back from getting it. i guess... hm i don't know. i mean there are many times in this book where he explains something and im like OH and it's so clear. maybe i need to see the difference in how the two different approaches play out because i cannot see them on my own. it probably doesn't help that i am terrible at that knights move joseki as i always find a way to lose that corner or get my territory destroyed whenever i use it. i don't know how to follow it up

Top
 Profile  
 
Offline
 Post subject: Re: Opening Theory Made Easy
Post #10 Posted: Mon Feb 18, 2013 4:30 am 
Gosei
User avatar

Posts: 1810
Liked others: 490
Was liked: 365
Rank: KGS 1-dan
Don't worry too much about this.
I've read this book maybe three times already and I'm certain I still get opening positions wrong. But that's okay, I'm still weak myself so there should be room for improvement everywhere =D

Furthermore to really get a good understanding of the opening you have to be able to come up with follow-ups. Like I said above it's not enough to just extend because the principle tells you so. If you extend and at the same time pincer an opponent's stone - that's great! Very efficient!
But this "coming up with follow-ups" requieres a fair bit of experience with positions on the board (their weaknesses etc.) and the ability to read ahead, e.g. what you can achieve when you play here and there and how your opponent has to react then here and there to not get killed or not become surrounded.

So, I would recommend that you just read straight through this book one time. Don't try too hard to figure everything out. If you are finished, play a couple of games and try to focus on your opening. When you lost a game, look at the first ~30 moves and compare them to the principles in the book. See if you followed them and when you have no clue what went wrong, post this game in the Game Analysis subforum here - maybe we can help you : )


post scriptum:
The problem with the Keima Joseki has most likely nothing to do with not knowing the follow-up of the Joseki but with general fighting strength. After you solved a lot of Tsumegos and Tesujis the Joseki follow-up (when there is one) sometimes present itself naturaly. Otherwise you just have to battle it out with your opponent ; )

_________________
My "guide" to become stronger in Go


This post by SoDesuNe was liked by: cherryhill
Top
 Profile  
 
Offline
 Post subject:
Post #11 Posted: Mon Feb 18, 2013 5:51 am 
Honinbo
User avatar

Posts: 8859
Location: Santa Barbara, CA
Liked others: 349
Was liked: 2076
GD Posts: 312
cherryhill wrote:
i am having a bit of trouble understanding... the difference between the 3rd line... and the 4th...
That's perfectly normal -- at your level, trying to understand the 3rd and 4th lines from a chapter is like
teaching a child about hot and cold by talking about jiggling atoms.

What the child needs is not particle physics; what she needs is a warm cup of tea, an ice cream, a blanket in winter...(*)

What you need is experience. Tons of it. In the order of tens, hundreds, or even 1,000+ of games (your mileage may vary :)).
SoDesuNe wrote:
Don't worry too much about this.
What SoDesuNe said -- just enjoy the book for now.


(*) Later, when the time comes, she can study all the quantum mechanics she wants. :mrgreen:


This post by EdLee was liked by: cherryhill
Top
 Profile  
 
Offline
 Post subject: Re: Opening Theory Made Easy
Post #12 Posted: Mon Feb 18, 2013 9:38 am 
Dies in gote
User avatar

Posts: 36
Liked others: 4
Was liked: 15
Rank: sdk
Phoenix wrote:
I don't much like "Opening Theory Made Easy", because I find it very jumpy and incomplete.

It covers a lot of base without being bogged down with unnecessary detail. ;-)
Phoenix wrote:
That being said, I can't think of another title to recommend for understanding the opening...

"In the beginning" by Ishigure is also good, but may be perceived as more difficult.

_________________
"The connection between the language in which we program and the problems and solutions we can imagine is very close" -- Bjarne Stoustrup


This post by Insane was liked by: Phelan
Top
 Profile  
 
Offline
 Post subject: Re: Opening Theory Made Easy
Post #13 Posted: Mon Feb 18, 2013 11:39 am 
Dies in gote

Posts: 63
Liked others: 12
Was liked: 21
Rank: 5k
KGS: peppernut
Quote:
i am having a bit of trouble understanding principle 6 which aims to explain the difference between the 3rd line being for completion and the 4th which is for development. he offers these two diagrams as a comparison.


Yes, the words "for development" are kind of abstract and I don't think they really help in explaining what's going on.

Fourth line stones have the potential to be expanded into larger territories than third line stones.

Third line stones create points that are more secure than 4th line stones, It's also easier to create living shapes on the third line and corner.

If you go to your diagrams, the invasions are important, but it's also important realize that Black is better poised to continue to play and add his territory. This is possible:

Click Here To Show Diagram Code
[go]$$ ---------------------------------------
$$ | . . . . . . . . . . . . . . . . . . . |
$$ | . . . . . . . . . . . . . . . . . . . |
$$ | . . . O O X . . . . . . . . . . . . . |
$$ | . . O , X X . . . X . . . . . , . . . |
$$ | . . . . . . . . . . . . . . . . . . . |
$$ | . . O . . . . . . . . . . . . . . . . |
$$ | . . . . . . . . . . . . . . . . . . . |
$$ | . . . . . . . . . . . . . . . . . . . |
$$ | . . . . . . . . . . . . . . . . . . . |
$$ | . . X , . . . . . , . . . . . , . . . |
$$ | . . . . . . . . . . . . . . . . . . . |
$$ | . . . B . . . . . . . . . . . . . . . |
$$ | . . . . . . . . . . . . . . . . . . . |
$$ | . . . X . . . . . . . . . . . . . . . |
$$ | . . . . . . . . . . . . . . . . . . . |
$$ | . . . X . . . . . O . . . . . , . . . |
$$ | . . . . . O . . . . . . . . . . . . . |
$$ | . . . B . . . . . . . . . . . . . . . |
$$ | . . . . . . . . . . . . . . . . . . . |
$$ ---------------------------------------[/go]


In the third line example, black cannot gain as much by adding a single stone, just 6 points as shown:

Click Here To Show Diagram Code
[go]$$ ---------------------------------------
$$ | . . . . . . . . . . . . . . . . . . . |
$$ | . . . . . . . . . . . . . . . . . . . |
$$ | . . . O O X . . . . . . . . . . . . . |
$$ | . . O , X X . . . X . . . . . , . . . |
$$ | . . . . . . . . . . . . . . . . . . . |
$$ | . . O . . . . . . . . . . . . . . . . |
$$ | . . . . . . . . . . . . . . . . . . . |
$$ | . . . . . . . . . . . . . . . . . . . |
$$ | . . . . . . . . . . . . . . . . . . . |
$$ | . . . , . . . . . , . . . . . , . . . |
$$ | . . B . . . . . . . . . . . . . . . . |
$$ | T T . . . . . . . . . . . . . . . . . |
$$ | T T X . . . . . . . . . . . . . . . . |
$$ | . . . . . . . . . . . . . . . . . . . |
$$ | . . . X . . . . . . . . . . . , . . . |
$$ | . . X . . O . . O . . . . . . . . . . |
$$ | . . . O . . . . . . . . . . . . . . . |
$$ | . . . . . . . . . . . . . . . . . . . |
$$ ---------------------------------------[/go]


Furthermore, if black tries to switch back to the 4th line, it doesn't work as well:

Click Here To Show Diagram Code
[go]$$ ---------------------------------------
$$ | . . . . . . . . . . . . . . . . . . . |
$$ | . . . . . . . . . . . . . . . . . . . |
$$ | . . . O O X . . . . . . . . . . . . . |
$$ | . . O , X X . . . X . . . . . , . . . |
$$ | . . . . . . . . . . . . . . . . . . . |
$$ | . . O . . . . . . . . . . . . . . . . |
$$ | . . . . . . . . . . . . . . . . . . . |
$$ | . . . . . . . . . . . . . . . . . . . |
$$ | . . W . . . . . . . . . . . . . . . . |
$$ | . . . , . . . . . , . . . . . , . . . |
$$ | . . . B . . . . . . . . . . . . . . . |
$$ | . . . . . . . . . . . . . . . . . . . |
$$ | . . . . . . . . . . . . . . . . . . . |
$$ | . . B . . . . . . . . . . . . . . . . |
$$ | . . . . . . . . . . . . . . . . . . . |
$$ | . . . X . . . . . . . . . . . , . . . |
$$ | . . X . . O . . O . . . . . . . . . . |
$$ | . . . O . . . . . . . . . . . . . . . |
$$ | . . . . . . . . . . . . . . . . . . . |
$$ ---------------------------------------[/go]


There's room for White to aim underneath, and because of this it turns out Black hasn't really made any new territory with his last move at all.

Notice now in this last diagram how black's 2 marked stones on the side are in a sense backwards! It would have been better to play the last stone on the third line, and the next to last on the fourth. As played it's the wrong order. To me, this is what development means. The box-like formations, moyos, and invasions are stuff you will learn later.

Top
 Profile  
 
Offline
 Post subject: Re: Opening Theory Made Easy
Post #14 Posted: Mon Feb 18, 2013 1:02 pm 
Gosei
User avatar

Posts: 1810
Liked others: 490
Was liked: 365
Rank: KGS 1-dan
Sorry, maybe I didn't understand you correctly but I think you just mixed up everything ^^

It's not about imagining black stones, which would complete his left side (it's also not strictly about territory).
It's about the decision if Black reacts to White's approach with a high move (fourth line) or a low one (third line). To make that decision it's important to know that a move on the fourth line aims at development, in most cases this is an extension on the third line. Otherwise the shape is incomplete and White could attack Black's base.
The problem in the given diagramme is that White is solid (strong) and low at the top left side. If Black know extends towards it (the proverb states something like don't approach thickness), he just makes it to _defend_ his high stone (but this does not defend all the territory - important!). Just defending is negative. It loses the initiative and in this case follows no plan.

So the third line extension from the high move doesn't look good in this case. That's why Black should play low in the first place. With playing on the third line Black has made a complete shape and has nothing to worry about at the moment. It's not about immediately extending from the third line, which might be a big move in the later stage of the opening but again, it serves now no further purpose.

_________________
My "guide" to become stronger in Go

Top
 Profile  
 
Offline
 Post subject: Re: Opening Theory Made Easy
Post #15 Posted: Mon Feb 18, 2013 1:18 pm 
Oza
User avatar

Posts: 2659
Liked others: 310
Was liked: 631
Rank: kgs 6k
Yes, with all due respect to peppernut I found her explanation a little confusing.

I see the explanation like this.

#1 The black extension on the left side is worth way more than the black extension on the right side.

Click Here To Show Diagram Code
[go]$$ ---------------------------------------
$$ | . . . . . . . . . . . . . . . . . . . |
$$ | . . . . . . . . . . . . . . . . . . . |
$$ | . . . O O X . . . . . . . X O O . . . |
$$ | . . W , X X . . . X . . . X X , W . . |
$$ | . . . W . . . . . . . . . . . . . . . |
$$ | . . . . . . . . . . . . . . . . W . . |
$$ | . . B . . . . . . . . . . . . . . . . |
$$ | . . . . . . . . . . . . . . . . B . . |
$$ | . . . . . . . . . . . . . . . . . . . |
$$ | . . X , . . . . . , . . . . . , X . . |
$$ | . . . . . . . . . . . . . . . . . . . |
$$ | . . . . . . . . . . . . . . . . . . . |
$$ | . . . . . . . . . . . . . . . . . . . |
$$ | . . . . . . . . . . . . . . . . . . . |
$$ | . . . . . . . . . . . . . . . . . . . |
$$ | . . . . . . . . . . . . . . . , . . . |
$$ | . . . . . . . . . . . . . . . . . . . |
$$ | . . . . . . . . . . . . . . . . . . . |
$$ | . . . . . . . . . . . . . . . . . . . |
$$ ---------------------------------------[/go]


#2 The black extension on the left is worth way more than the black extension on the right (or the alternate point marked A).

Click Here To Show Diagram Code
[go]$$ ---------------------------------------
$$ | . . . . . . . . . . . . . . . . . . . |
$$ | . . . . . . . . . . . . . . . . . . . |
$$ | . . . . . . . . . . . . . . . . . . . |
$$ | . . . , . . . . . . . . . . . , . . . |
$$ | . . . . . . . . . . . . . . . . . . . |
$$ | . . . . . . . . . . . . . . . . . . . |
$$ | . . . . . . . . . . . . . . . . . . . |
$$ | . . . . . . . . . . . . . . . . . . . |
$$ | . . . . . . . . . . . . . . . . . . . |
$$ | . . B , . . . . . , . . . . . B a . . |
$$ | . . . . . . . . . . . . . . . . . . . |
$$ | . . . . . . . . . . . . . . . . . . . |
$$ | . . . . . . . . . . . . . . . . . . . |
$$ | . . . X . . . . . . . . . . . . X . . |
$$ | . . . . . . . . . . . . . . . . . . . |
$$ | . . . X . . . . . O . . . . . X . . . |
$$ | . . . . . O . . . . . . . O . . . . . |
$$ | . . . . . . . . . . . . . . . . . . . |
$$ | . . . . . . . . . . . . . . . . . . . |
$$ ---------------------------------------[/go]


#3 So therefore, in a position like the one on the left, the high value of the second extension should make B more eager to make the first extension, and so he should choose a joseki ( :b1:) that will make the first extension worth making ( :b3:).

But on the left, the low value of the second extension should make B less eager to make the first extension, so he should choose a joseki ( :b1:) that will allow him to omit the first extension entirely (tenuki for :b3:).

Click Here To Show Diagram Code
[go]$$ ---------------------------------------
$$ | . . . . . . . . . . . . . . . . . . . |
$$ | . . . . . . . . . . . . . . . . . . . |
$$ | . . . O O X . . . . . . . X O O . . . |
$$ | . . W , X X . . . X . . . X X , W . . |
$$ | . . . W . . . . . . . . . . . . . . . |
$$ | . . . . . . . . . . . . . . . . W . . |
$$ | . . C . . . . . . . . . . . . . . . . |
$$ | . . . . . . . . . . . . . . . . . . . |
$$ | . . . . . . . . . . . . . . . . . . . |
$$ | . . 3 , . . . . . , . . . . . , . . . |
$$ | . . . . . . . . . . . . . . . . . . . |
$$ | . . . . . . . . . . . . . . . . . . . |
$$ | . . . . . . . . . . . . . . . . . . . |
$$ | . . . 1 . . . . . . . . . . . . 1 . . |
$$ | . . . . . . . . . . . . . . . . . . . |
$$ | . . . X . . . . . 2 . . . . . X . . . |
$$ | . . . . . O . . . . . . . O . . . . . |
$$ | . . . . . . . . . . . . . . . . . . . |
$$ | . . . . . . . . . . . . . . . . . . . |
$$ ---------------------------------------[/go]


This post by jts was liked by: cherryhill
Top
 Profile  
 
Offline
 Post subject: Re: Opening Theory Made Easy
Post #16 Posted: Tue Feb 19, 2013 2:36 am 
Dies in gote

Posts: 63
Liked others: 12
Was liked: 21
Rank: 5k
KGS: peppernut
My apologies to the OP if my explanation was confusing. Apparently I have a slightly different perspective on this. I remember when I was learning the game, finally understanding the difference between 3rd and 4th line was really eye-opening. For me personally, it was the most important thing for reaching 10kyu.

jts explained what I was thinking of really well. His 2nd diagram in particular is something I find very important. When you understand it, and see why the right side is wrong and the left side correct, then you'll understand why you put stones on the 3rd line and why you put them on the 4th.

Top
 Profile  
 
Offline
 Post subject: Re: Opening Theory Made Easy
Post #17 Posted: Thu Feb 21, 2013 10:41 pm 
Lives in gote

Posts: 460
Liked others: 149
Was liked: 101
Rank: 3 kyu
Universal go server handle: billywoods
I also find this issue a little confusing. I have a tentative explanation, but I'm going to phrase it as a series of responses to jts's answer:

jts wrote:
#1 The black extension on the left side is worth way more than the black extension on the right side.

Click Here To Show Diagram Code
[go]$$ ---------------------------------------
$$ | . . . . . . . . . . . . . . . . . . . |
$$ | . . . . . . . . . . . . . . . . . . . |
$$ | . . . O O X . . . . . . . X O O . . . |
$$ | . . W , X X . . . X . . . X X , W . . |
$$ | . . . W . . . . . . . . . . . . . . . |
$$ | . . . . . . . . . . . . . . . . W . . |
$$ | . . B . . . . . . . . . . . . . . . . |
$$ | . . . . . . . . . . . . . . . . B . . |
$$ | . . . . . . . . . . . . . . . . . . . |
$$ | . . X , . . . . . , . . . . . , X . . |
$$ | . . . . . . . . . . . . . . . . . . . |
$$ | . . . . . . . . . . . . . . . . . . . |
$$ | . . . . . . . . . . . . . . . . . . . |
$$ | . . . . . . . . . . . . . . . . . . . |
$$ | . . . . . . . . . . . . . . . . . . . |
$$ | . . . . . . . . . . . . . . . , . . . |
$$ | . . . . . . . . . . . . . . . . . . . |
$$ | . . . . . . . . . . . . . . . . . . . |
$$ | . . . . . . . . . . . . . . . . . . . |
$$ ---------------------------------------[/go]

Absolutely - because the extension on the left is a 2-space extension, and on the right it's a 1-space extension. This is completely clear.

The same is also clear in this diagram, which might be more illustrative:

Click Here To Show Diagram Code
[go]$$
$$ ---------------------------------------
$$ | . . . . . . . . . . . . . . . . . . . |
$$ | . . . . . . . . . . . . . . . . . . . |
$$ | . . . O O X . . . . . . . X O O . . . |
$$ | . . W , X X . . . X . . . X X , W . . |
$$ | . . . W . . . . . . . . . . . . . . . |
$$ | . . . . . . . . . . . . . . . . W . . |
$$ | . . B . . . . . . . . . . . . . . . . |
$$ | . . . . . . . . . . . . . . . . B . . |
$$ | . . . . . . . . . . . . . . . . . . . |
$$ | . . X , . . . . . , . . . . . , . . . |
$$ | . . . . . . . . . . . . . . . . X . . |
$$ | . . . . . . . . . . . . . . . . . . . |
$$ | . . . . . . . . . . . . . . . . . . . |
$$ | . . . . . . . . . . . . . . . . . . . |
$$ | . . . . . . . . . . . . . . . . . . . |
$$ | . . . . . . . . . . . . . . . , . . . |
$$ | . . . . . . . . . . . . . . . . . . . |
$$ | . . . . . . . . . . . . . . . . . . . |
$$ | . . . . . . . . . . . . . . . . . . . |
$$ ---------------------------------------[/go]


On the left hand side, white's shape was a little weaker - 'incomplete' - and now white has neither potential for development nor points, and black can still slide later in endgame. On the right, white doesn't care - he never wanted to develop further from that corner, and the shape was (and still is) complete. No points or development potential have been lost. Comparing to if white played first:

Click Here To Show Diagram Code
[go]$$
$$ ---------------------------------------
$$ | . . . . . . . . . . . . . . . . . . . |
$$ | . . . . . . . . . . . . . . . . . . . |
$$ | . . . O O X . . . . . . . X O O . . . |
$$ | . . W , X X . . . X . . . X X , W . . |
$$ | . . . W . . . . . . . . . . . . . . . |
$$ | . . . . . . . . . . . . . . . . W . . |
$$ | . . . . . . . . . . . . . . . . . . . |
$$ | . . W . . . . . . . . . . . . . . . . |
$$ | . . . . . . . . . . . . . . . . W . . |
$$ | . . X , . . . . . , . . . . . , . . . |
$$ | . . . . . . . . . . . . . . . . X . . |
$$ | . . . . . . . . . . . . . . . . . . . |
$$ | . . . . . . . . . . . . . . . . . . . |
$$ | . . . . . . . . . . . . . . . . . . . |
$$ | . . . . . . . . . . . . . . . . . . . |
$$ | . . . . . . . . . . . . . . . , . . . |
$$ | . . . . . . . . . . . . . . . . . . . |
$$ | . . . . . . . . . . . . . . . . . . . |
$$ | . . . . . . . . . . . . . . . . . . . |
$$ ---------------------------------------[/go]


On the left, white develops nicely (albeit in a smallish way) and 'completes' his shape. On the right, white doesn't really develop at all, and just makes a couple of extra points on a shape that was already complete.

But I find this explanation spurious - if the sequence in question had been played in the lower left and right (and the board was not empty there, as your diagrams suggest), neither of these moves is necessary or even very big. The upper left is a little bigger than the upper right, but not by much. After all, for white to play his development/defence move is small and gote.

Well, anyway. Is this what you were getting at?

jts wrote:
#3 So therefore, in a position like the one on the left, the high value of the second extension should make B more eager to make the first extension, and so he should choose a joseki ( :b1:) that will make the first extension worth making ( :b3:).

But on the left, the low value of the second extension should make B less eager to make the first extension, so he should choose a joseki ( :b1:) that will allow him to omit the first extension entirely (tenuki for :b3:).

Click Here To Show Diagram Code
[go]$$ ---------------------------------------
$$ | . . . . . . . . . . . . . . . . . . . |
$$ | . . . . . . . . . . . . . . . . . . . |
$$ | . . . O O X . . . . . . . X O O . . . |
$$ | . . W , X X . . . X . . . X X , W . . |
$$ | . . . W . . . . . . . . . . . . . . . |
$$ | . . . . . . . . . . . . . . . . W . . |
$$ | . . C . . . . . . . . . . . . . . . . |
$$ | . . . . . . . . . . . . . . . . . . . |
$$ | . . . . . . . . . . . . . . . . . . . |
$$ | . . 3 , . . . . . , . . . . . , . . . |
$$ | . . . . . . . . . . . . . . . . . . . |
$$ | . . . . . . . . . . . . . . . . . . . |
$$ | . . . . . . . . . . . . . . . . . . . |
$$ | . . . 1 . . . . . . . . . . . . 1 . . |
$$ | . . . . . . . . . . . . . . . . . . . |
$$ | . . . X . . . . . 2 . . . . . X . . . |
$$ | . . . . . O . . . . . . . O . . . . . |
$$ | . . . . . . . . . . . . . . . . . . . |
$$ | . . . . . . . . . . . . . . . . . . . |
$$ ---------------------------------------[/go]

3 on the left is one of those moves that limits (and threatens to limit further) white's development, whereas such a move wouldn't do so on the right. This is clear, but all you've convinced us of is that it's better for black to play the big loose extension than the small tight one when white's shape is incomplete. If I understand correctly, cherryhill wanted to know sort of the opposite: when white's shape is complete, why is the small tight one better than the big loose one?

Click Here To Show Diagram Code
[go]$$
$$ ---------------------------------------
$$ | . . . . . . . . . . . . . . . . . . . |
$$ | . . . . . . . . . . . . . . . . . . . |
$$ | . . . O O X . . . . . . . . . . . . . |
$$ | . . O , X X . . . X . . . . . , . . . |
$$ | . . . . . . . . . . . . . . . . . . . |
$$ | . . O . . . . . . . . . . . . . . . . |
$$ | . . . . . . . . . . . . . . . . . . . |
$$ | . . . . . . . . . . . . . . . . . . . |
$$ | . . . . . . . . . . . . . . . . . . . |
$$ | . . X , . . . . . , . . . . . , . . . |
$$ | . . . . . . . . . . . . . . . . . . . |
$$ | . . . . . . . . . . . . . . . . . . . |
$$ | . . . . . . . . . . . . . . . . . . . |
$$ | . . . X . . . . . . . . . . . . . . . |
$$ | . . . . . . . . . . . . . . . . . . . |
$$ | . . . X . . . . . O . . . . . , . . . |
$$ | . . . . . O . . . . . . . . . . . . . |
$$ | . . . . . . . . . . . . . . . . . . . |
$$ | . . . . . . . . . . . . . . . . . . . |
$$ ---------------------------------------[/go]


Click Here To Show Diagram Code
[go]$$ ---------------------------------------
$$ | . . . . . . . . . . . . . . . . . . . |
$$ | . . . . . . . . . . . . . . . . . . . |
$$ | . . . O O X . . . . . . . . . . . . . |
$$ | . . O , X X . . . X . . . . . , . . . |
$$ | . . . . . . . . . . . . . . . . . . . |
$$ | . . O . . . . . . . . . . . . . . . . |
$$ | . . . . . . . . . . . . . . . . . . . |
$$ | . . . . . . . . . . . . . . . . . . . |
$$ | . . . . . . . . . . . . . . . . . . . |
$$ | . . . , . . . . . , . . . . . , . . . |
$$ | . . . . . . . . . . . . . . . . . . . |
$$ | . . . . . . . . . . . . . . . . . . . |
$$ | . . . . . . . . . . . . . . . . . . . |
$$ | . . X . . . . . . . . . . . . . . . . |
$$ | . . . . . . . . . . . . . . . . . . . |
$$ | . . . X . . . . . . . . . . . , . . . |
$$ | . . X . . O . . O . . . . . . . . . . |
$$ | . . . O . . . . . . . . . . . . . . . |
$$ | . . . . . . . . . . . . . . . . . . . |
$$ ---------------------------------------[/go]

After all, just visually, it looks like it's making a lot more points.

And my tentative answer is: the few extra points it might make are not adequate compensation for the weakness it introduces in black's shape, whereas giving white a weakness is adequate compensation.

Firstly, how many points is it worth? In the second diagram, it's clear that both black and white are settled and strong and on the third line, so anything that happens on the left hand side is a matter of a very small number of points (maybe 10 at most); moreover, any moves there are small and slow and not likely to gain all the points there anyway. It will probably either turn neutral or split neatly in half. It's very non-urgent.

Secondly, does black actually make those points? Well, not really. White can allow that to happen and tenuki if there are big things elsewhere (if white is happy for black to spend 2 gote moves on 10-15 points and security of his group), but personally as white I'd usually play immediately as follows:

Click Here To Show Diagram Code
[go]$$Wm1
$$ ---------------------------------------
$$ | . . . . . . . . . . . . . . . . . . . |
$$ | . . . . . . . . . . . . . . . . . . . |
$$ | . . . O O X . . . . . . . . . . . . . |
$$ | . . O , X X . . . X . . . . . , . . . |
$$ | . . . . . . . . . . . . . . . . . . . |
$$ | . . O . . . . . . . . . . . . . . . . |
$$ | . . . . . . . . . . . . . . . . . . . |
$$ | . . 2 . . . . . . . . . . . . . . . . |
$$ | . . . . . . . . . . . . . . . . . . . |
$$ | . . X , . . . . . , . . . . . , . . . |
$$ | . . . . . . . . . . . . . . . . . . . |
$$ | . . 1 . 3 . . . . . . . . . . . . . . |
$$ | . . . . . . . . . . . . . . . . . . . |
$$ | . . . X . . . . . . . . . . . . . . . |
$$ | . . . . . . . . . . . . . . . . . . . |
$$ | . . . X . . . . . O . . . . . , . . . |
$$ | . . . . . O . . . . . . . . . . . . . |
$$ | . . . . . . . . . . . . . . . . . . . |
$$ | . . . . . . . . . . . . . . . . . . . |
$$ ---------------------------------------[/go]

White can easily come inside, and some fighting sequence will ensue (above is the start of one potential simple continuation) in which white has a weak group (for obvious reasons), black has a weak group (because of the white group in the upper left!), white's upper left is completed (so won't be hurt by the ensuing fight), and black's lower left is incomplete (and is under attack from both sides). (Black connecting is just as bad:

Click Here To Show Diagram Code
[go]$$Wm1
$$ ---------------------------------------
$$ | . . . . . . . . . . . . . . . . . . . |
$$ | . . . . . . . . . . . . . . . . . . . |
$$ | . . . O O X . . . . . . . . . . . . . |
$$ | . . O , X X . . . X . . . . . , . . . |
$$ | . . . . . . . . . . . . . . . . . . . |
$$ | . . O . . . . . . . . . . . . . . . . |
$$ | . . . . . . . . . . . . . . . . . . . |
$$ | . . . . . . . . . . . . . . . . . . . |
$$ | . . . . . . . . . . . . . . . . . . . |
$$ | . 7 X , . . . . . , . . . . . , . . . |
$$ | . . 3 4 . . . . . . . . . . . . . . . |
$$ | . . 1 2 . . . . . . . . . . . . . . . |
$$ | . . 5 6 . . . . . . . . . . . . . . . |
$$ | . . . X . . . . . . . . . . . . . . . |
$$ | . . . . . . . . . . . . . . . . . . . |
$$ | . . . X . . . . . O . . . . . , . . . |
$$ | . . . . . O . . . . . . . . . . . . . |
$$ | . . . . . . . . . . . . . . . . . . . |
$$ | . . . . . . . . . . . . . . . . . . . |
$$ ---------------------------------------[/go]


And maybe something like this happens? Hardly satisfactory - black gets no points, and his lower left is still looking like it needs another move to get a solid base, and the thickness is a little useless because of white's strong-ish group on the lower side.)

Let's compare this to if white had an incomplete shape in the upper left:

Click Here To Show Diagram Code
[go]$$Wm1
$$ ---------------------------------------
$$ | . . . . . . . . . . . . . . . . . . . |
$$ | . . . . . . . . . . . . . . . . . . . |
$$ | . . . O O X . . . . . . . . . . . . . |
$$ | . . O , X X . . . X . . . . . , . . . |
$$ | . . . O . . . . . . . . . . . . . . . |
$$ | . . . . . . . . . . . . . . . . . . . |
$$ | . . 2 . . . . . . . . . . . . . . . . |
$$ | . . . . . . . . . . . . . . . . . . . |
$$ | . . . . . . . . . . . . . . . . . . . |
$$ | . . X , . . . . . , . . . . . , . . . |
$$ | . . . . . . . . . . . . . . . . . . . |
$$ | . . 1 . 3 . . . . . . . . . . . . . . |
$$ | . . . . . . . . . . . . . . . . . . . |
$$ | . . . X . . . . . . . . . . . . . . . |
$$ | . . . . . . . . . . . . . . . . . . . |
$$ | . . . X . . . . . O . . . . . , . . . |
$$ | . . . . . O . . . . . . . . . . . . . |
$$ | . . . . . . . . . . . . . . . . . . . |
$$ | . . . . . . . . . . . . . . . . . . . |
$$ ---------------------------------------[/go]

Now black has no weak groups. (Well, the lower left is weak, but black has sente and can fix it immediately, then go on to attack the weak white group.)

Click Here To Show Diagram Code
[go]$$Wm1
$$ ---------------------------------------
$$ | . . . . . . . . . . . . . . . . . . . |
$$ | . . . . . . . . . . . . . . . . . . . |
$$ | . . . . . X . . . . . . . . . . . . . |
$$ | . . . O . . . . . X . . . . . , . . . |
$$ | . . . . . . . . . . . . . . . . . . . |
$$ | . . . O . . . . . . . . . . . . . . . |
$$ | . T . . . . . . . . . . . . . . . . . |
$$ | . . 2 . . . . . . . . . . . . . . . . |
$$ | . . . . . . . . . . . . . . . . . . . |
$$ | . . X , . . . . . , . . . . . , . . . |
$$ | . . . . . . . . . . . . . . . . . . . |
$$ | . . 1 . 3 . . . . . . . . . . . . . . |
$$ | . . . . . . . . . . . . . . . . . . . |
$$ | . . . X . . . . . . . . . . . . . . . |
$$ | . . . . . . . . . . . . . . . . . . . |
$$ | . . . X . . . . . O . . . . . , . . . |
$$ | . . . . . O . . . . . . . . . . . . . |
$$ | . . . . . . . . . . . . . . . . . . . |
$$ | . . . . . . . . . . . . . . . . . . . |
$$ ---------------------------------------[/go]

Or here (or 2 at triangle), black's group is stronger than before because white's upper left corner is weaker - either white defends and black gets a free jump to the centre, or white doesn't defend and black can settle while taking away white's base by sliding. This is a messy fight for both sides because everything is weak, but at least it's a fight on roughly equal terms.

So, in practice, this invasion might not happen any more - white has nasty aji left behind and doesn't want black to be able to poke at it. And if white goes back to defend, black can defend the large extension, and black made a lot of points in one gote move (and one sente move), which is better than the more solid joseki, which only makes a few points in gote.

Click Here To Show Diagram Code
[go]$$Wm1
$$ ---------------------------------------
$$ | . . . . . . . . . . . . . . . . . . . |
$$ | . . . . . . . . . . . . . . . . . . . |
$$ | . . . . . X . . . . . . . . . . . . . |
$$ | . . . O . . . . . X . . . . . , . . . |
$$ | . . . . . . . . . . . . . . . . . . . |
$$ | . . . O . . . . . . . . . . . . . . . |
$$ | . . . . . . . . . . . . . . . . . . . |
$$ | . . 1 . . . . . . . . . . . . . . . . |
$$ | . . . . . . . . . . . . . . . . . . . |
$$ | . . X , 2 . . . . , . . . . . , . . . |
$$ | . . . . . . . . . . . . . . . . . . . |
$$ | . . . . . . . . . . . . . . . . . . . |
$$ | . . . . . . . . . . . . . . . . . . . |
$$ | . . . X . . . . . . . . . . . . . . . |
$$ | . . . . . . . . . . . . . . . . . . . |
$$ | . . . X . . . . . O . . . . . , . . . |
$$ | . . . . . O . . . . . . . . . . . . . |
$$ | . . . . . . . . . . . . . . . . . . . |
$$ | . . . . . . . . . . . . . . . . . . . |
$$ ---------------------------------------[/go]


I'm unsure about all of this, and probably shouldn't be talking about go when I can't sleep, but these are my thoughts. I'm open to correction.

Top
 Profile  
 
Offline
 Post subject:
Post #18 Posted: Fri Feb 22, 2013 2:03 am 
Honinbo
User avatar

Posts: 8859
Location: Santa Barbara, CA
Liked others: 349
Was liked: 2076
GD Posts: 312
jts wrote:
#1 The black extension on the left side is worth way more than the black extension on the right side.
Click Here To Show Diagram Code
[go]$$
$$ -----------------------------------------
$$ | . . . . . . . . . . . . . . . . . . . |
$$ | . . . . . . . . . . . . . . . . . . . |
$$ | . . . O O X . . . . . . . X O O . . . |
$$ | . . W , X X . . . X . . . X X , W . . |
$$ | . . . W . . . . . . . . . . . . . a . |
$$ | . . . . . . . . . . . . . . . . W . . |
$$ | . . B . . . . . . . . . . . . . . . . |
$$ | . . . . . . . . . . . . . . . . B . . |
$$ | . . . . . . . . . . . . . . . . . . . |
$$ | . . X , . . . . . , . . . . . , X . . |
$$ | . . . . . . . . . . . . . . . . . . . |
$$ | . . . . . . . . . . . . . . . . . . . |[/go]
billywoods wrote:
Absolutely - because the extension on the left is a 2-space extension, and on the right it's a 1-space extension. This is completely clear.
It's not clear to me. On the right, B has a nice follow-up of (a).
billywoods wrote:
I'm unsure about all of this...
SoDesuNe wrote:
Don't worry too much about this.
For cherryhill, just this (again).

Top
 Profile  
 
Offline
 Post subject:
Post #19 Posted: Fri Feb 22, 2013 2:49 am 
Honinbo
User avatar

Posts: 8859
Location: Santa Barbara, CA
Liked others: 349
Was liked: 2076
GD Posts: 312
peppernut wrote:
...finally understanding the difference between 3rd and 4th line was really eye-opening.
For me personally, it was the most important thing for reaching 10kyu.
Many people (perhaps most amateurs) are mistaken about a great many things(*) like these in Go.

They like to think, Oh, I finally understand [insert your favorite: attack, invasion, sabaki, moyo, thickness, weakness, etc...]
It's not like that, at all.
It's more like this:
At ~10k, there is the ~10k understanding of 3rd line and 4th line.
At ~5k, there is the ~5k understanding of 3rd line and 4th line.
At ~1d, there is the ~1d understanding of 3rd line and 4th line.
At ~3d, there is the ~3d understanding of 3rd line and 4th line.
At ~6d, there is the ~6d understanding of 3rd line and 4th line.
At near pro level, there is the near-pro-level understanding of 3rd line and 4th line.
At pro level, there is the pro-level understanding of 3rd line and 4th line.
At top pro level, there is the top-pro-level understanding of 3rd line and 4th line.

There is no limit to this.

There is no such thing as "the" difference between 3rd line and 4th line.
There is also no such thing as "the final understanding" of the 3rd line and 4th line.
We hear people say "3rd line: territory; 4th line: influence" -- that is not "the" difference;
that is merely a general idea, a guideline (for beginners, perhaps)
which is not even true in many cases.

Most likely, what you experienced was a better understanding of 3rd vs. 4th line,
and this, together with many other improvements, helped you reach ~10k level,
which is nice.

(*) Stolen from Episode VI.


This post by EdLee was liked by 2 people: Ellyster, ez4u
Top
 Profile  
 
Offline
 Post subject: Re: Opening Theory Made Easy
Post #20 Posted: Fri Feb 22, 2013 5:03 am 
Gosei
User avatar

Posts: 1582
Location: Hong Kong
Liked others: 54
Was liked: 544
GD Posts: 1292
So what's EdLee's current understanding of the 3rd and 4th line?

_________________
http://tchan001.wordpress.com
A blog on Asian go books, go sightings, and interesting tidbits
Go is such a beautiful game.

Top
 Profile  
 
Display posts from previous:  Sort by  
Post new topic Reply to topic  [ 25 posts ]  Go to page 1, 2  Next

All times are UTC - 8 hours [ DST ]


Who is online

Users browsing this forum: No registered users and 1 guest


You cannot post new topics in this forum
You cannot reply to topics in this forum
You cannot edit your posts in this forum
You cannot delete your posts in this forum
You cannot post attachments in this forum

Search for:
Jump to:  
Powered by phpBB © 2000, 2002, 2005, 2007 phpBB Group